The manual of orbis-reframe 0.10.1, the newest release. What has changed since is in the development version on GitHub.
Colour
The Colour section (settings sidebar, Video tab) corrects the brightness and colours of a clip: to brighten a dark clip, make colours richer, or make clips filmed at different times of day match. It can also apply a LUT, for example the one that turns footage filmed in a log mode (Insta360's I-Log) or in HDR (HLG) into normal colours.
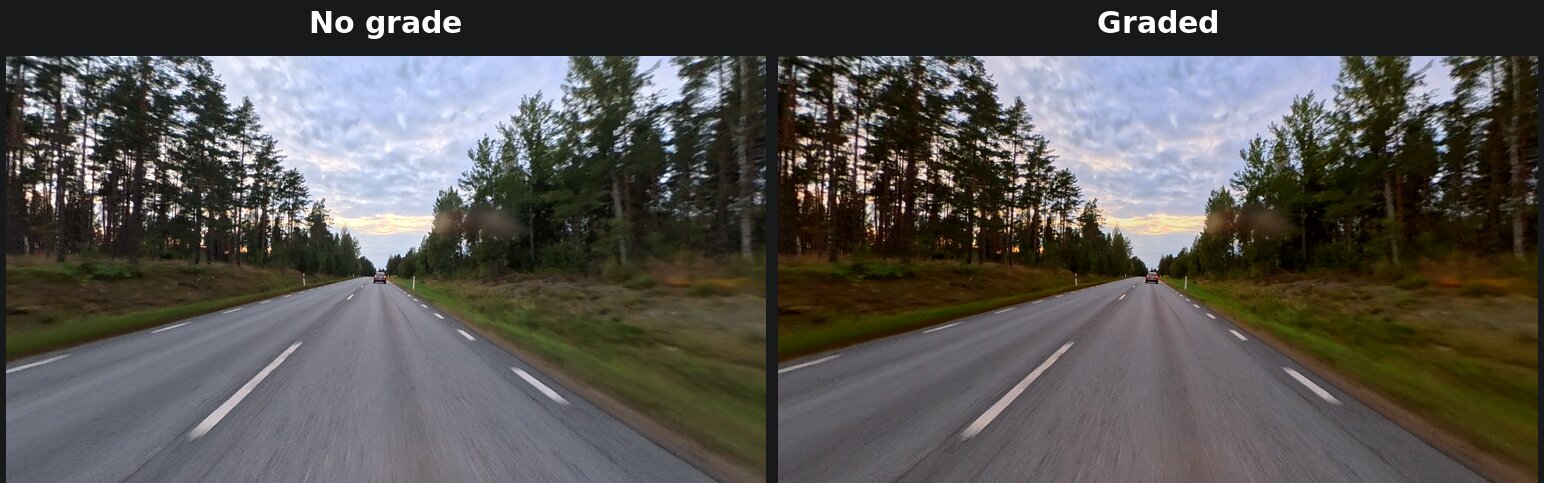
Right: exposure −0.2 EV, contrast +10 %, saturation +30 %, temperature +15 %. Warmer and richer colours, with the bright sky kept.
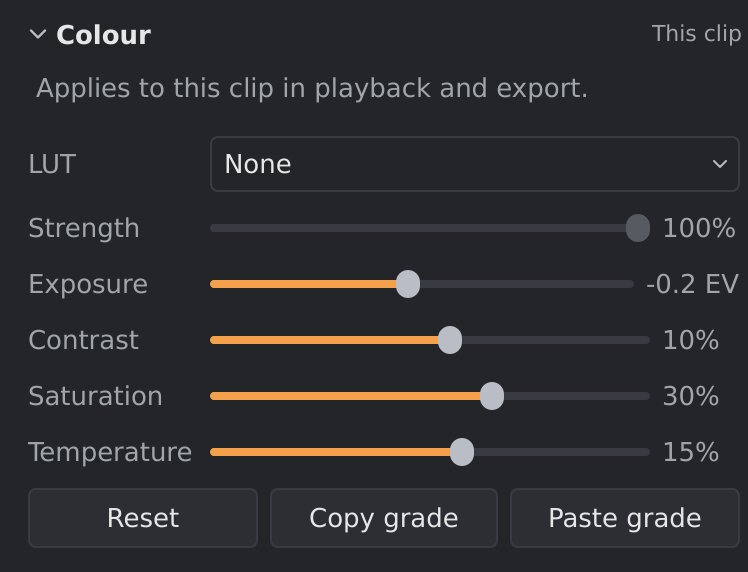
The settings
| Setting | What it does | Range |
|---|---|---|
| LUT | A colour look-up table (a .cube file) applied to the picture before the settings below. None applies none. See LUTs. |
|
| Strength | How much of the LUT: 100 % is the LUT's look, 0 % the clip without it. Only with a LUT. | 0 to 100 % |
| Exposure | Makes the whole picture brighter or darker, in stops (EV): +1 EV is twice as bright, −1 EV half as bright. | −3 to +3 EV |
| Contrast | Positive values make dark parts darker and bright parts brighter; negative values make the picture flatter. | −100 % to +100 % |
| Saturation | Positive values make colours stronger; negative values make them paler. −100 % gives black and white. | −100 % to +100 % |
| Temperature | Positive values make the picture warmer (more yellow-orange), negative values cooler (more blue). | −100 % to +100 % |
No LUT and all four sliders at 0 leave the picture as filmed. Changes show in the viewport at once. Reset removes the LUT and sets all four back to 0.
LUTs
A LUT changes every colour of the picture into another one, by a table in a
file. Camera makers publish one for their log modes: footage filmed in a log
mode looks flat and grey on purpose (it keeps more detail in the bright and
dark parts), and the maker's LUT turns it into normal-looking colours. Other
LUTs give a picture a look (a film stock, a teal-and-orange grade).
orbis-reframe reads 3D LUTs in the .cube format, the one camera makers and
most LUT packs use.
To give a clip a LUT:
- Select the clip and open Colour (settings sidebar, Video tab).
- In LUT, choose Load LUT… and pick the
.cubefile, or choose one the list already offers.
Load LUT… also takes the .zip file a camera maker's download comes
in, without unpacking it first. If the zip holds one LUT, that one is used.
If it holds several (one per target and size, or one per lens), a list asks
which one; it starts on the largest Rec.709 one, the right choice for a
normal export. Only the LUT you pick is taken out of the zip.
orbis-reframe copies the file into the project's luts/ folder (see
Projects and export), so the project keeps working
when the original is moved or deleted. After that, the LUT is in the LUT
list for every clip of the project: choose it there, no need to load it again.
The same goes for the LUT orbis-reframe comes with, HLG to Rec.709 (see
below): the list offers it for HLG clips, and choosing it copies it into the
project.
A project that hasn't been saved yet uses the file where it is, and copies
it when you save the project. A project file without a folder of its own
(from before project folders) always uses the file where it is. A LUT
taken out of a zip has no file of its own to point at, so for those two it
is put in the luts folder of orbis-reframe's data folder
(~/.local/share/orbis-reframe/luts) instead.
The LUT is applied first, then Exposure, Contrast, Saturation and Temperature adjust the result. So with log footage, choose the LUT first and then use the sliders for the fine-tuning.
Insta360 I-Log. Insta360 publishes its LUTs on its I-Log download page: one for the X5's 8-bit I-Log and one for the 10-bit I-Log of newer cameras. Use the one for your camera, and only on clips filmed in I-Log: on normal clips it makes the colours far too strong. Load the downloaded zip as it is. The X5's holds one LUT; the X6's holds six, and the one to pick for a normal export is X6_I-Log_to_Rec709_BT1886_s65_v2, where the list starts (the others are for HDR video, which orbis-reframe doesn't export, or a smaller grid).
DJI D-Log M. DJI publishes a LUT for each camera's D-Log M on the
camera's download page (for the Avata 360: DJI Avata 360 D-Log M to
Rec.709, a .cube file). Load it as it is, and only on clips filmed in
D-Log M.
HDR (HLG) clips. Some cameras film in HDR: the Insta360 X6's Dolby Vision mode, for example, records HLG (the HDR format of broadcast TV). orbis-reframe shows and exports normal (SDR, Rec.709) video, where an HLG picture looks dim and flat. The LUT HLG to Rec.709, which comes with orbis-reframe, converts it: it keeps the colours and the mid-tones, puts a white wall a little below full white, and rolls the brighter parts (sky, lamps, reflections) off smoothly instead of clipping them. Use it only on HLG clips.
orbis-reframe recognises a clip filmed in a log profile (the camera notes it in the file; Media information shows it as the Colour profile). For now that's Insta360's I-Log and DJI's D-Log M. It also recognises an HDR clip, 360 or flat (phones film HLG too), from the format its video says it is in (HLG or PQ). While such a clip has no LUT, the LUT field has a red frame and the section says which LUT it needs: for an HLG clip, HLG to Rec.709; for a PQ clip, a PQ to Rec.709 LUT you load yourself. For an I-Log clip:
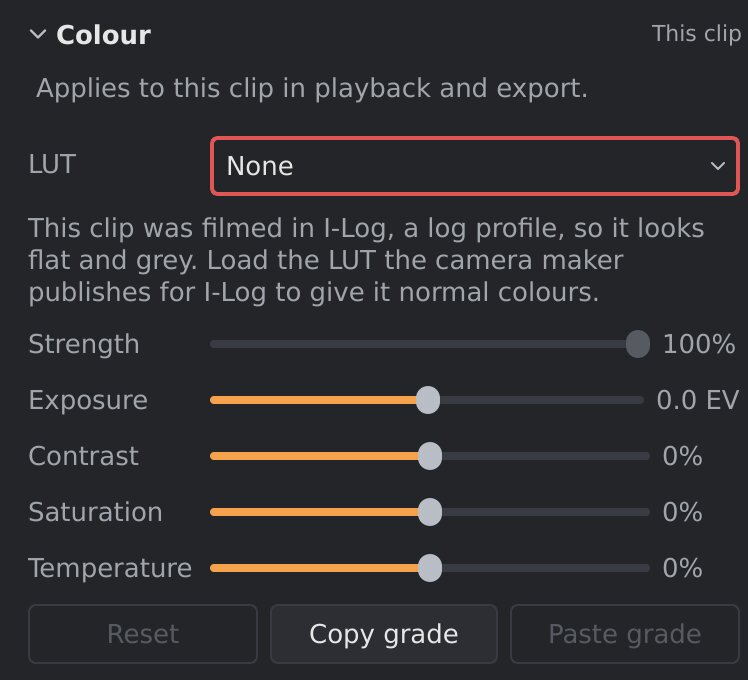
The frame goes away as soon as the clip has a LUT.
If a clip's LUT file is missing or can't be read (for example a project
copied without its luts/ folder), the clip is shown without it, and the
Colour section says why under LUT. Load the file again to fix it.
Which clip it changes
The colour settings belong to one clip on the video track: the clip you selected, or the clip under the playhead if none is selected (see The main window). Each clip keeps its own settings. When you split a clip, both halves keep them.
The settings are the same for the whole clip: they don't change over time. They apply to playback, screenshots and the export. Picture-in-picture videos aren't changed.
Giving several clips the same look
- Select the clip whose look you want, and click Copy grade.
- Select another clip, and click Paste grade. It gets the LUT, its strength and all four settings.
The same is on the timeline: right-click a clip for Copy colour grade, Paste colour grade, and Paste colour grade to all clips, which gives every clip on the video track the copied look.
The copied grade is kept until you close orbis-reframe, so you can paste it
as often as you like, in other projects too: pasted into another project,
its LUT is copied into that project's luts/ folder as well. Edit ▸ Undo (Ctrl+Z) takes back a paste or a
Reset; pasting to all clips is undone in one step.
Tips
- Watch the sky. 360° footage nearly always has bright sky in it. Raising the exposure or the contrast can turn it plain white, and the detail can't be brought back. Look at a frame with a lot of sky while you set them.
- Small steps. Small changes (a few tenths of a stop, 10 to 30 %) usually
look natural. To compare with the original, click Reset, then
Edit ▸ Undo (
Ctrl+Z) to get your settings back. - Make clips match. If one clip is darker or bluer than the one before it, put the playhead on the cut, and adjust the second clip until the two sides of the cut look alike.