The manual of orbis-reframe 0.10.1, the newest release. What has changed since is in the development version on GitHub.
Privacy blur
In many countries you should hide other people's number plates before you publish a video. A 360° video sees every car around you, so orbis-reframe can find the plates for you and blur them.
orbis-reframe blurs number plates only. It doesn't blur faces.
Demo video: plate blur and stabilization on a motorcycle ride (YouTube, 3:41). Recorded in October 2026, so the window may look a little different in your version.
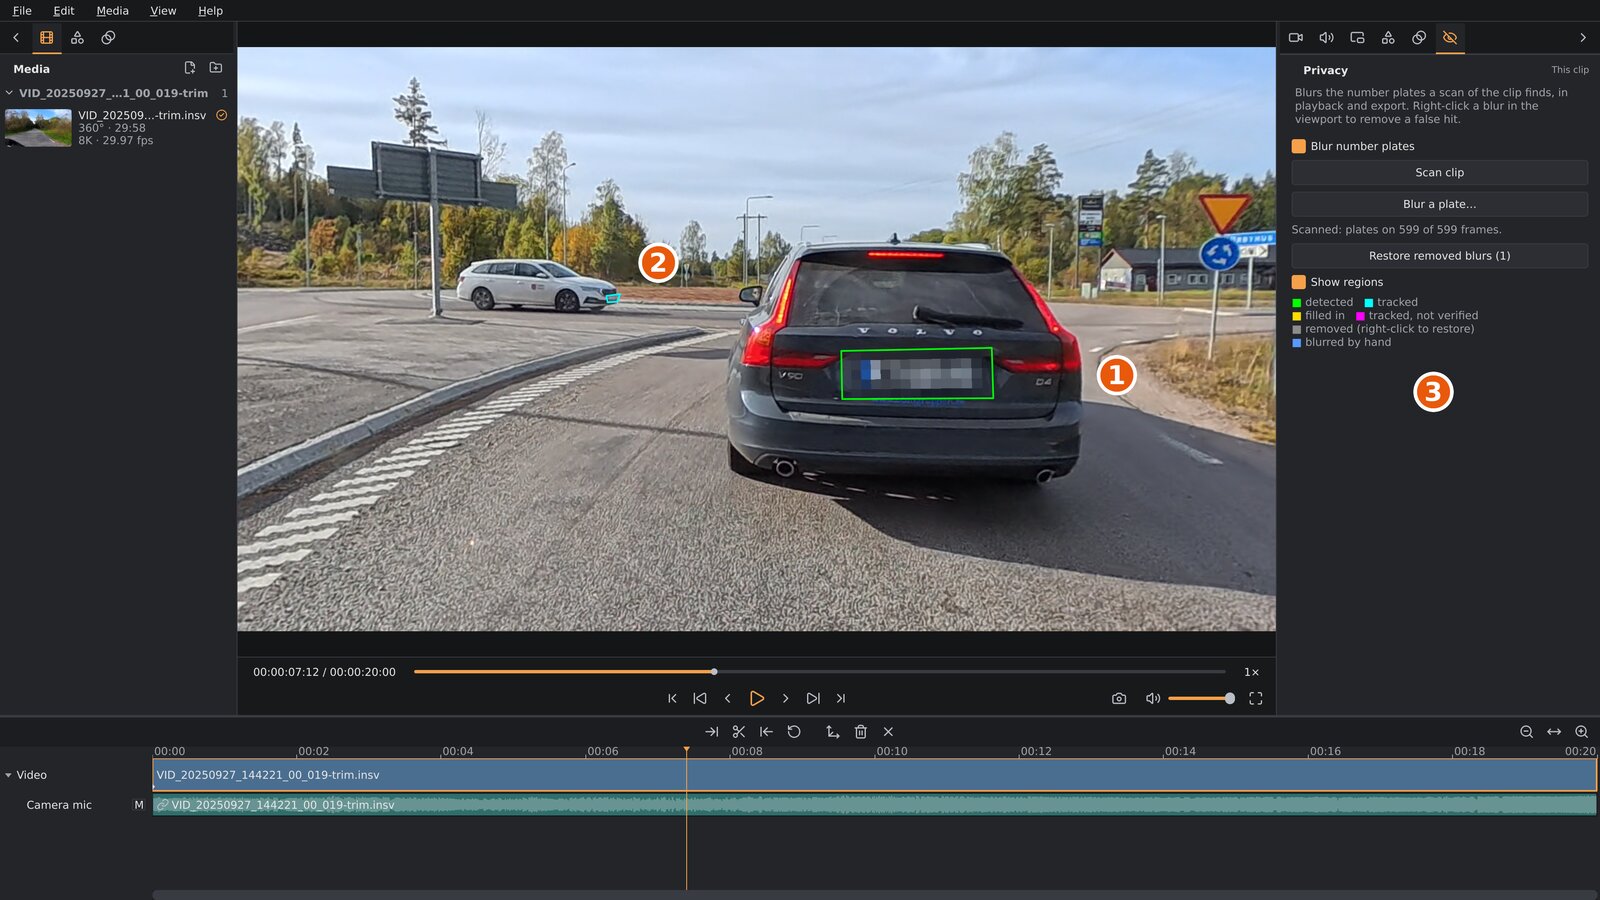
- A plate the scan found, blurred, and outlined because Show regions is on. Green means the scan detected it in this frame.
- A plate further away, outlined in cyan: the scan followed it from frames where it was detected.
- The settings sidebar's Privacy tab, with the colour key for the outlines.
Blurring the plates in a clip
The privacy blur is set for each clip on the video track: the clip you selected, or the clip under the playhead.
- Open the settings sidebar's Privacy tab and tick Blur number plates.
- Click Scan clip. orbis-reframe looks for plates in the whole clip (its trimmed part, and the footage past it that a crossfade shows), a little faster than the clip plays. The tab shows how far it has come. Stop scan stops it and keeps the part scanned.
- When the scan is done, the tab says on how many frames it found plates, and every plate it found is blurred, in playback, screenshots and the export.
- Check the result: play the clip, ideally with Show regions on (see below), and fix what the scan got wrong.
The scan result belongs to the clip and isn't lost when you close the
project. Other clips cut from the same file have their own scans, so each
can be scanned with its own settings (stabilization on in one, off in
another). A clip you duplicate or split after scanning keeps the scan in
both copies, until one of them is scanned again. Undo after a scan
brings back the clip's scan from before; scans no clip (nor undo) can
reach any more are removed when you save. Scans are stored in the project's
cache/ folder (in ~/.cache/orbis-reframe/ for an untitled project or
one from before project folders); Save project as… copies them to the
new folder. If you delete the cache folder, scan again.
No export without a scan. While Blur number plates is on, a clip must be scanned over its whole trimmed length. If it isn't, the export and screenshots are refused with a message saying which clip still needs scanning. This stops you from publishing a video you think is blurred but isn't. If you lengthen a clip's trim after scanning, the tab says Partly scanned: scan it again.
Checking the scan: Show regions
Tick Show regions to outline everything the scan found, in colours that say how each plate was found:
| Colour | Meaning |
|---|---|
| Green | Detected: found in this frame. |
| Cyan | Tracked: followed from a frame where it was detected. |
| Yellow | Filled in: a short gap between two sightings, bridged. |
| Magenta | Tracked, not verified: followed, but not confirmed. Check these. |
| Grey | Removed by you (see below). Right-click to bring it back. |
| Blue | Blurred by hand (see below). |
The outlines show whether the blur is on or not, and are never exported.
Removing a wrong blur
Sometimes the scan blurs something that isn't a plate, such as a road sign or a sticker. Right-click the blur in the viewport:
- Remove this blur drops it in every frame it appears in.
- Remove this blur from here on keeps it before the playhead and drops it from there.
To bring a removed blur back, turn on Show regions, right-click its grey outline and choose Restore this blur. Restore removed blurs in the tab brings back all of them at once. Edit ▸ Undo works too.
Blurring a plate the scan missed
If the scan missed a plate, blur it by hand:
- Move the playhead to a frame where the plate is clearly visible.
- Click Blur a plate… in the Privacy tab, or press
B. Playback pauses. - Drag a box around the plate in the viewport (
Esccancels). - orbis-reframe follows the plate forwards from that frame, then backwards from it, and blurs it for as long as it can follow it. The tab shows how far it has come. Stop following stops it.
The tab counts the plates blurred by hand. A hand-blurred plate is blurred even without a scan, and even with Blur number plates off. To remove one, right-click it in the viewport: Remove this blur, or Remove this blur from here on.
If the plate goes out of sight and comes back, the blur may stop where it was lost. Blur it again from a frame after it reappears.
Stabilization and the blur
The scan and the hand-blurred plates fit the picture as it was stitched at the time. With stabilization on, the picture is stitched slightly differently (see Stabilization). If you turn the clip's stabilization on or off afterwards, the blurs may sit a little off the plates when the camera swings fast.
orbis-reframe notices this. The Privacy tab shows a warning, and an export or screenshot asks before going ahead. Check the blurs with Show regions, or scan again and blur the hand-blurred plates again, or set the stabilization back to how it was.
If the buttons are greyed out
On a flat video on the video track, the tab says the blur works on 360° clips only for now, and has no buttons.
A note in the tab says why: the plate model is missing from the installation (install orbis-reframe again). Scan clip and Blur a plate… are also greyed out while a scan is running or a plate is being followed.
Before you publish
The scan finds most plates, not all of them. Small, far away, dirty, angled or fast-moving plates can be missed, especially in the short moments when they come into view. Before you publish, play the exported video through and look for plates that are still readable. Blur any you find by hand, or reframe so they're out of the picture.