The manual of orbis-reframe 0.10.1, the newest release. What has changed since is in the development version on GitHub.
Stitching
A 360° camera such as the X5 films with two fisheye lenses, back to back. Each one sees a little more than half of the world. Stitching joins the two pictures into one 360° sphere. orbis-reframe does this itself, frame by frame, while it plays and exports: there is no separate stitching step, and you don't need Insta360 Studio.
The line where the two pictures meet is the seam. It runs all the way round the camera, through both sides of it (left and right of the lenses), over the top and under the bottom. Usually you won't see it. It can show when something is very close to the camera, or when the settings below don't match how the footage was filmed.
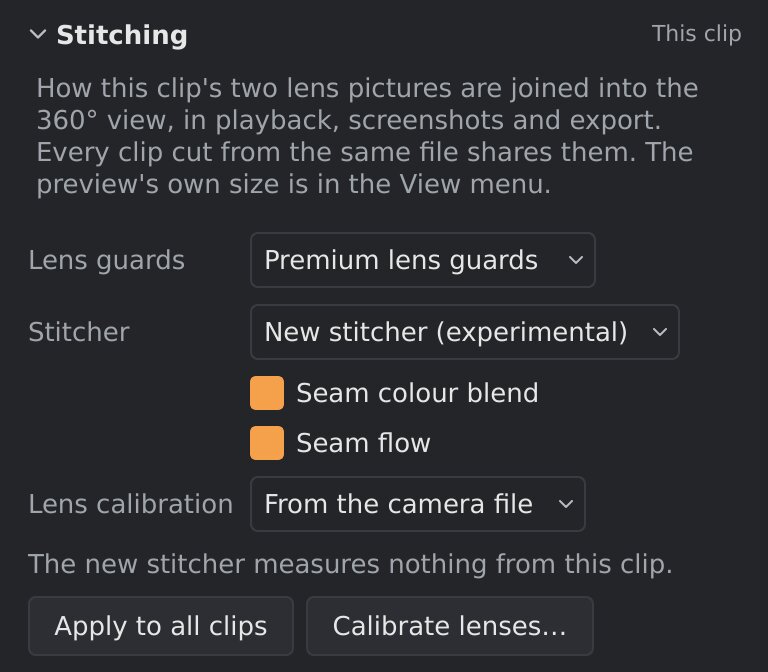
The settings are in the Stitching section, at the top of the settings sidebar's Video tab. It starts folded: click its title to open it. Like the other This clip sections, it shows the clip you've selected, or else the clip under the playhead, and its settings apply to playback, screenshots and the export alike.
The settings belong to the clip's file: every clip cut from the same file (after a split, say) shares them, since one recording is filmed with one set of lens guards. Clips from different files can differ, so a project can mix footage filmed with and without guards.
Lens guards
Set Lens guards to what was fitted over the lenses when you filmed:
- None: bare lenses.
- Standard lens guards
- Premium lens guards
Lens guards bend the light slightly, so each choice uses a different lens
model, recorded in the .insv file by the camera. The camera doesn't record
whether guards were fitted, so you have to tell orbis-reframe. With the
wrong choice the two pictures don't line up: things along the seam show up
twice, or have a piece missing.
The first clip in a project starts with Premium lens guards. A clip you add later takes the settings of the nearest 360° clip beside it, or of the other clips from its file if there are any. If you filmed without guards, or with the standard ones, change this first; when the whole project was filmed the same way, Apply to all clips gives every 360° clip the settings shown.
Some cameras, the ONE X2, the X6 and the DJI Avata 360 among them, record no lens-guard models. Their clips are always stitched with bare lenses: Lens guards shows None, greyed out, with a line saying why. A clip from such a camera comes in with None whatever the clip beside it has, and Apply to all clips leaves its lens guards alone; applied from one of its clips, it copies only Stitcher to the others. (A file that has only one of the two guard models greys out the other choice.)
Lens calibration
The camera records a model of its two lenses in every file, and orbis-reframe stitches with it. That model is made at the factory, and on a real camera it can be off by a few tenths of a degree: far-away things along the seam then don't quite line up, and the picture as a whole sits slightly differently from where Insta360 Studio puts it. Calibrate lenses… measures your own camera's lenses with a chart on your monitor, so the two pictures line up better than with the model in the file. It works on Insta360 cameras: the DJI Avata 360 describes its lenses another way, and its clips are always stitched with the model in their file.
Lens calibration says which model a clip is stitched with:
- From the camera file: the model the camera recorded. Every clip starts with it unless you've calibrated its camera.
- Calibrated and a date: one you made with Calibrate lenses… for this camera and these lens guards. Hold the pointer over it to see how well it fitted.
A calibration belongs to one camera (it goes by the serial number in the file) and one choice of Lens guards, since guards change how the lenses draw the picture. Once you've calibrated a camera, clips from it that you add to a project get the calibration for their lens guards by themselves. Changing a clip's Lens guards switches to its camera's calibration for the new guards, or to the camera file's if there is none. A clip set to From the camera file stays with it until you pick a calibration. If you calibrate again later, the newer one shows as the camera's latest: projects keep the calibration their clips had until you pick the new one, so finished projects don't change.
The project keeps a copy of the calibration each clip uses, so a project opens the same on another computer. Projects with a calibrated clip can't be opened by orbis-reframe versions before 0.8.
Calibrating your camera
You need the camera, a monitor and about 20 minutes. Do it once for every set of lens guards you film with (none, standard, premium). It needs no project or clip: start it with Calibrate lenses… in the Stitching section, or Media ▸ Calibrate camera lenses…, also from the project library. It walks you through it:
- Show the chart. Pick the monitor and click Show the chart: a chessboard with small patterns in its white squares fills the screen. A click or Esc closes it again. Square size is filled in from the size the monitor reports; measure one square with a ruler, and if it's different, put in what you measure (a tenth of a millimetre is plenty).
- Film it. Fit the lens guards you want to calibrate for (or none), film in 8K, and hold the camera 50 cm to 1 m from the screen. Turn it slowly through five full circles, so the chart passes through every part of both lenses' pictures, right out to their edges: turning left to right; tilting forwards over the top; left to right again with the camera leaning 45° one way, then 45° the other way; and once round with the camera's sides (where the lenses meet) passing over the chart. Stop for a moment every few seconds: only the frames where the chart holds still are used. About three minutes is plenty.
- Measure it. Choose the recording and the Lens guards it was filmed with, and click Measure. Finding the chart in every frame takes a few minutes, about twice as long as the recording.
- The result says whether the calibration fits, how far out towards their edges both lenses saw the chart, how closely the chart's corners fit, and how much it moves the picture where the lenses meet compared with the camera file's model. Save keeps it for the camera and lens guards; with Use it for this project's clips from this camera ticked, the project's clips from that camera with those guards switch to it.
A recording that isn't good enough says why, and can't be saved:
- The chart was still in too few frames: turn more slowly and stop more often.
- The front (or back) lens never saw the chart near the edge of its picture: turn the camera further, so the chart passes the edge of each lens.
- The chart's corners don't fit the lens model closely enough: the square size is wrong, or the chart was blurred or had reflections on it.
- The two lenses don't agree on where the chart is: the camera was moving too fast.
Calibrating clears the clip's seam alignment and lens colour (below), which are then measured again with the new model. Calibrate lenses… is greyed out in builds made without OpenCV's chart detection.
Stitcher
Stitcher picks how the two pictures are joined where they meet:
- Depth-aware seam: lines the two pictures up, frame by frame, at the distance of what is on the seam (see Depth-aware seam below).
- Fixed seam: lines the pictures up for things far away, the same in every frame. The seam holds still, but things close to the camera show up twice where the pictures meet.
- New stitcher (experimental): the stitcher new clips start with, still being built; it will replace the other two. It joins the pictures from the lens model (the camera file's, or your calibration), and works out anything more from each frame and the ones just before it, not from the clip as a whole: the seam alignment and lens colour below aren't used with it. So far that is the colour where the lenses meet (Seam colour blend below) and close things crossing the seam (Seam flow below). For a camera whose files place one lens slightly off (the Antigravity A1, by about half a degree), it corrects the lenses by a fixed amount measured for the camera model; with your calibration it doesn't. Projects with a clip set to it can't be opened by orbis-reframe versions before 0.8.
Where a camera's own body shows in its pictures -- behind the DJI Avata 360, the drone's frame reaches into both lenses' pictures where they meet -- every stitcher takes that stretch from the lens that sees past it, and the seam colour blend and seam flow measure nothing from the body. The two pictures share only a narrow strip there, so close things behind the drone join less well than elsewhere.
A clip added to a project takes the stitcher of the 360 clip next to it, so a project made before the new stitcher became the default keeps the stitcher it was made with, for its new clips too; a project opened from before then looks as it did. To move a whole project over, pick New stitcher (experimental) on one clip and click Apply to all clips.
Seam colour blend
With the new stitcher, Seam colour blend (under Stitcher, on for new clips) evens out the two lenses' colours where they meet. It compares what both lenses see in the overlap, closest to the seam, stretch by stretch round it, over each frame and the quarter second before it, and moves each lens half of the difference there: in full up to about 12° from the seam, fading to nothing by 30°, so the rest of each picture keeps the colour the lens recorded. A stretch where the lenses can't be compared (a sky blown out in a colour, flare in one lens, something close crossing the seam) takes the correction of the stretches beside it; clipped highlights are left as they are. Going by a quarter second keeps the correction steady while the picture moves, and still follows a difference that changes with what the lenses see; when the light changes, it follows within about a tenth of a second.
When the sun shines into one lens, light scattered inside it lays a haze over that lens's picture (veiling light): the dark parts lift a lot, bright ones hardly. No colour correction matches that, so where one lens has such a haze along the seam, Seam colour blend takes it out of that lens there, in the overlap and fading out by 10° past it, and matches the colour of what is left. It goes by the frame and the one before it, since the haze moves with the sun in the lens as the camera turns. Further into that lens the haze stays (the other lens can't see there, so nothing says how much there is). The rays and coloured blobs of flare are left as they are.
With Seam colour blend and Seam flow both on, the two pictures meet in a narrow blend, about a degree and a half wide, right on the seam. A wide blend would mix both lenses where each is at its softest, near the edge of its picture, and blur the seam. Where the lenses still show different pictures there -- the haze and the rays the sun puts into one lens only, something close that the seam flow can't line up -- a narrow blend would draw a line along the seam, so along that stretch the blend widens to the whole overlap. It widens as soon as such a difference appears and narrows again over a few frames, so it doesn't flicker. With either setting off, the pictures are blended over the whole overlap.
When you jump to a frame, orbis-reframe looks at the quarter second before it as it gets there, so a frame looks the same however you get to it: played, jumped to, saved as a screenshot or exported. Turn it off to see the lenses as they recorded. With Depth-aware seam and Fixed seam it is greyed out: they match the lenses their own way (Lens colour below).
Seam flow
Something close to the camera that crosses the seam -- the handlebars, a mirror, your arm -- sits in a slightly different place in each lens, since the two lenses are a few centimetres apart. With the new stitcher, Seam flow (under Seam colour blend, on for new clips) joins it up. In every frame it finds where each lens shows each part of the overlap round the seam (optical flow, both ways), and draws the two pictures towards each other: each lens moves by a share that grows from nothing 8° from the seam to half the difference on the seam, so both show a close thing in the same place there. Further than 8° from the seam each picture keeps its own geometry, and far things, which the lenses already show in the same place, don't move. Where the overlap is bright and has nothing to match -- sky clipped to white, or the haze the sun lays over the scene, which each lens draws in its own way -- the flow leaves the picture where it is, so the seam beside the sun doesn't swim.
The flow is averaged over each frame and the four before it, so the seam holds still while things pass through it; when you jump to a frame, orbis-reframe measures those frames first, so the frame looks the same however you get to it. A close thing that moves fast across the seam can still smear for a frame or two. Turn it off to see the lenses joined at a fixed distance, as with Fixed seam. It runs on the graphics card; if orbis-reframe has to stitch on the processor instead, it needs a build with OpenCV (the packages and AppImage have it) and is left out otherwise.
Depth-aware seam
The two lenses sit a few centimetres apart, so they see things close to the camera from slightly different places, just like your two eyes do. Far away things line up at the seam, but close ones (the handlebars, the rider, the stick) don't, and show up twice or broken where the lenses meet.
With Stitcher set to Depth-aware seam, orbis-reframe works out for every frame how far away the things along the seam are, and lines the two pictures up at that distance. It goes by the frames just before and after rather than one, so the seam doesn't jump between a close object and the road behind it when both match about equally well; something close that really moves onto the seam is followed within a fraction of a second.
For that it analyses the parts of each clip you use, once, in the background after the seam alignment and lens colour (below), the clip under the playhead first, while playback is paused. From then on a frame is stitched the same way however you get to it: played, stepped back to, saved as a screenshot or exported. The analysis is kept in the project's cache folder, so it isn't done again next time, and isn't saved in the project file. Until a clip is analysed, its seam is worked out as it plays, from the frames played so far; a frame you jump to can then look a little different from the same frame played into. An export analyses what it still needs first, which shows as Analysing the seam in its progress. On a computer that decodes the video without the graphics card, clips aren't analysed in the background (it would take too long) -- only an export's or a screenshot's own frames are. It matches the lenses by the detail they see, not by how bright they are, so glare from a low sun on the seam, which each lens draws differently, isn't taken for something close. Where the match can't tell the distance -- a smooth stretch of sky, or a fence or grille whose pattern repeats -- the seam doesn't guess: it takes the distance from the stretches beside it, or keeps it far away. On a camera whose lenses sit further apart (the Antigravity A1) it lines up nothing closer than about 70 cm.
Things at different distances side by side (a rack in front of the bike's tail, a mirror stem in front of the road) can't all line up at one distance. So the seam also looks for the line across the overlap where the two lenses agree best, and joins them there with a short blend, instead of fading one into the other over the whole overlap.
A short blend would show any difference in brightness or colour between the two lenses as a step; how they are matched is under Lens colour below.
Very close things that the two lenses see against different backgrounds (a crash bar and a cable right under the camera) can still look doubled in places: no single distance lines everything up there, and there's no line the lenses agree on either. There the seam keeps the long fade, which shows them softly doubled rather than broken.
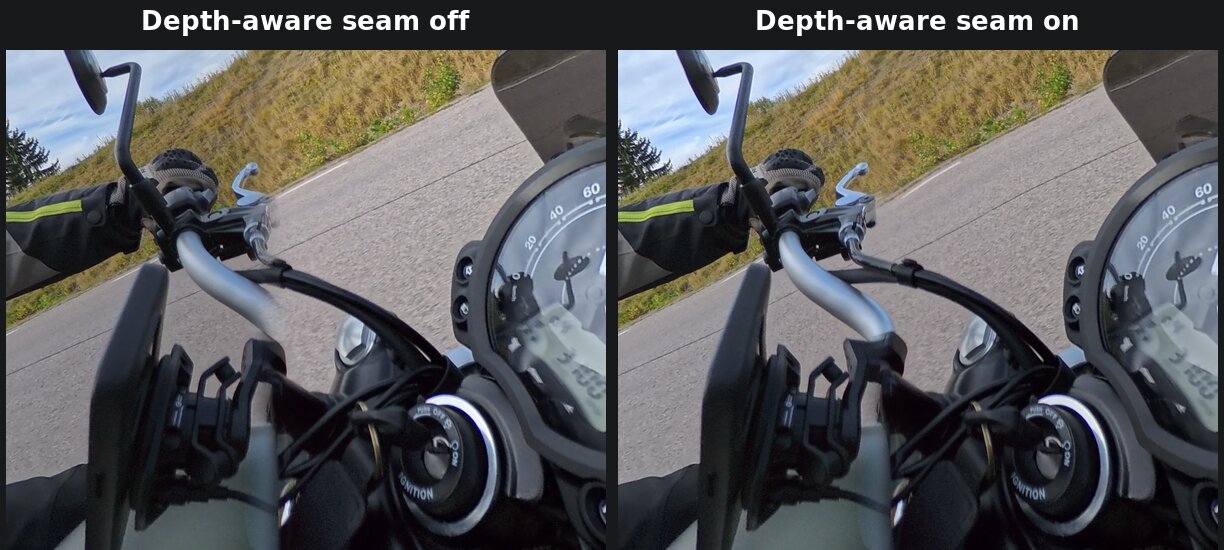
The handlebar crosses the seam. Off, the bar is broken and the brake cable shows twice; on, they join up.
Where nothing is close to the camera, as on drone footage, it has nothing to line up, and the picture just round the seam can seem to move or bend slightly while playing: pick Fixed seam there, or the new stitcher.
Seam alignment
A camera's two lenses are never mounted quite perfectly, and the lens model in the file doesn't capture every small difference: on far-away things the two pictures can disagree by a few tenths of a degree, which shows as fine detail (branches, wires, window frames) slightly doubled along the seam. With Depth-aware seam or Fixed seam, orbis-reframe measures how the two lenses line up from the video itself, once for each clip, and corrects the lens model by that: how the back lens is turned, where its centre is, and how large both lenses draw the picture near the seam. Things close to the camera don't line up by this alone; see Depth-aware seam above. Like the gyro sync (see Stabilization), this runs in the background while playback is paused, and the result is saved in the project.
The Stitching section shows, in one line, how far this, the lens colour measurement (see Lens colour below) and the depth-aware seam's analysis have got for the clip under the playhead:
| Message | Meaning |
|---|---|
| Measuring this clip's seam… | The seam alignment is running. The lens colour is measured after it. |
| Seam aligned; measuring this clip's lens colours… | The seam is done, the lens colour is running. |
| Seam aligned and lens colours matched for this clip. | Both done. |
| Analysing this clip's seam… N % | After both: the depth-aware seam's analysis (see Depth-aware seam above) is running. It stops while playing and goes on from where it was. |
| The new stitcher measures nothing from this clip. | Stitcher is set to New stitcher (experimental), which needs none of these: it joins the lenses from their lens model, and its Seam colour blend goes by the frames as they're shown. |
| Couldn't align this clip's seam (…) | The seam alignment didn't succeed; the brackets say why (below). The clip is stitched with the camera's lens model only, and its lens colour is still measured. |
| … couldn't match the lens colours (…) | The lens colour measurement didn't succeed, for one of the same reasons. The lenses are stitched as recorded. |
Hold the pointer over the line to see what was measured. For the seam: how far the back lens is turned to line up with the front one (yaw, pitch and roll, in degrees), how far its picture's centre moves (in percent of the picture's width), and how much larger (or, negative, smaller) both lenses draw the picture near the seam (the lens scale, in percent). A fraction of a degree, and a few hundredths of a percent, are normal. For the lens colour: how far apart the two lenses were on the seam, per colour, in percent; a few percent is normal.
The reasons a measurement gives:
- the file can't be read: the file is damaged or not a video. The technical details are in the log.
- not a 360 camera file: the file is a video, but not one from a 360 camera orbis-reframe knows.
- this kind of 360 clip isn't supported: the camera's file, in a mode orbis-reframe can't stitch.
- too little detail along the seam: the picture where the two lenses meet is too plain (sky, a wall, darkness) to line them up by.
Changing Lens guards or Lens calibration measures the clip's file again, because the alignment depends on the lens model. Projects from orbis-reframe 0.5 and older measured only how the back lens is turned; their clips are measured again when the project opens.
Lens colour
The two lenses of a camera never record quite the same colour: one is a little warmer or brighter than the other, and towards their rims they fall off differently, in colour too. Left alone, that would show as a step along the seam. With Depth-aware seam or Fixed seam, orbis-reframe measures how the two lenses of a clip differ, colour by colour, from frames spread across the clip, once for each clip, right after the seam alignment; frames with flare from a low sun, and very dark parts of the picture, are left out, and so is a colour where it is clipped (a bright sky's blue), while the other colours there still count. Each lens is then brought half way towards the other over its whole picture, so the seam has no step and neither lens is changed more than needed. The result is saved in the project.
On most cameras the difference stays the same through a clip. Where it drifts (the ONE X2's lenses do), a small, slow correction from the frames being played follows it. And it isn't always the same all the way round the seam: with a low sun, one lens catches veiling light on the sun's side, and on some clips the lenses agree on one stretch of the seam and differ on the rest. So along the seam the two lenses are also matched stretch by stretch, frame by frame, from what both see right where they meet (the difference can depend on what is there: the lenses may agree on the sky and not on the shadowed trees below it); a stretch where they see nothing alike to compare (a sky blown out in every colour, very close things) is left alone, and doesn't take its neighbours' correction either. This correction only touches the overlap and fades out just past it, and follows the picture within a frame or two as the camera turns.
When the sun shines into one lens, light scattered inside that lens lays a haze over its picture (veiling light): the dark parts lift a lot, bright ones hardly. A colour correction can't match that, so where one lens has such a haze along the seam, the haze is taken out of that lens there, and the two lenses are blended over the whole overlap rather than meeting on a line. Further into that lens the haze stays (the other lens can't see there, so nothing says how much there is): it fades out towards the seam instead of stopping at it. The rays and coloured blobs of flare (reflections inside the lens) are left as they are. The stretch-by-stretch match and the haze need Stitcher set to Depth-aware seam; the new stitcher's Seam colour blend does both its own way (above).
Bright highlights are left as recorded: a sky that is blown out in both lenses stays the same white on both sides of the seam rather than turning slightly grey on one.
The Stitching section's line shows when it's done (see Seam alignment above).
Like the seam alignment, changing Lens guards or Lens calibration measures the clip's file again. Projects from older versions of orbis-reframe matched the lenses frame by frame, or measured the lens colour without the colours a clipped part still has; their clips are measured again when the project opens, so their colour along the seam changes slightly.
Preview size
View ▸ Preview size is in the View menu, not in the sidebar: it changes only the preview you see while editing, never the export, and it almost never matters. The viewport normally draws straight from the two lens pictures at full detail. Only when the graphics card or driver can't do that does orbis-reframe stitch a flat 360° preview first, and this sets its size. When the card's memory is only short for a moment, the viewport shows the flat preview for a few seconds and then draws from the lenses again by itself. Auto uses the clip's full detail, as much as can play smoothly at its frame rate.
Filming tips
- Keep important things off the seam. Point one lens at what matters most (the road ahead, the person you're filming). The seam then runs through the camera's sides, where close objects are least likely to be.
- Keep close things away from the camera's sides. A hand, a handlebar or a wall near the side of the camera crosses the seam. The new stitcher's seam flow and the depth-aware seam help, but the further away, the cleaner the join.
- A selfie stick straight below the camera mostly disappears: it falls in the narrow gap between what the two lenses see. Keep the stick in line with the camera body so it stays in that gap.