The manual of orbis-reframe 0.10.1, the newest release. What has changed since is in the development version on GitHub.
Titles
A title is text shown over your video: the name of the ride, a place, a date. Titles sit on overlay tracks, like picture-in-picture videos (Picture in picture), and are placed, keyframed and faded the same way. They can also slide in and out, pop up, or type themselves on letter by letter, and show the time of day the video was recorded, running as it plays, the speed, altitude and heading from the camera's GPS, or how far you lean and the G-forces -- as text, or drawn as a gauge, and the road around you, or the whole trip, as a map.
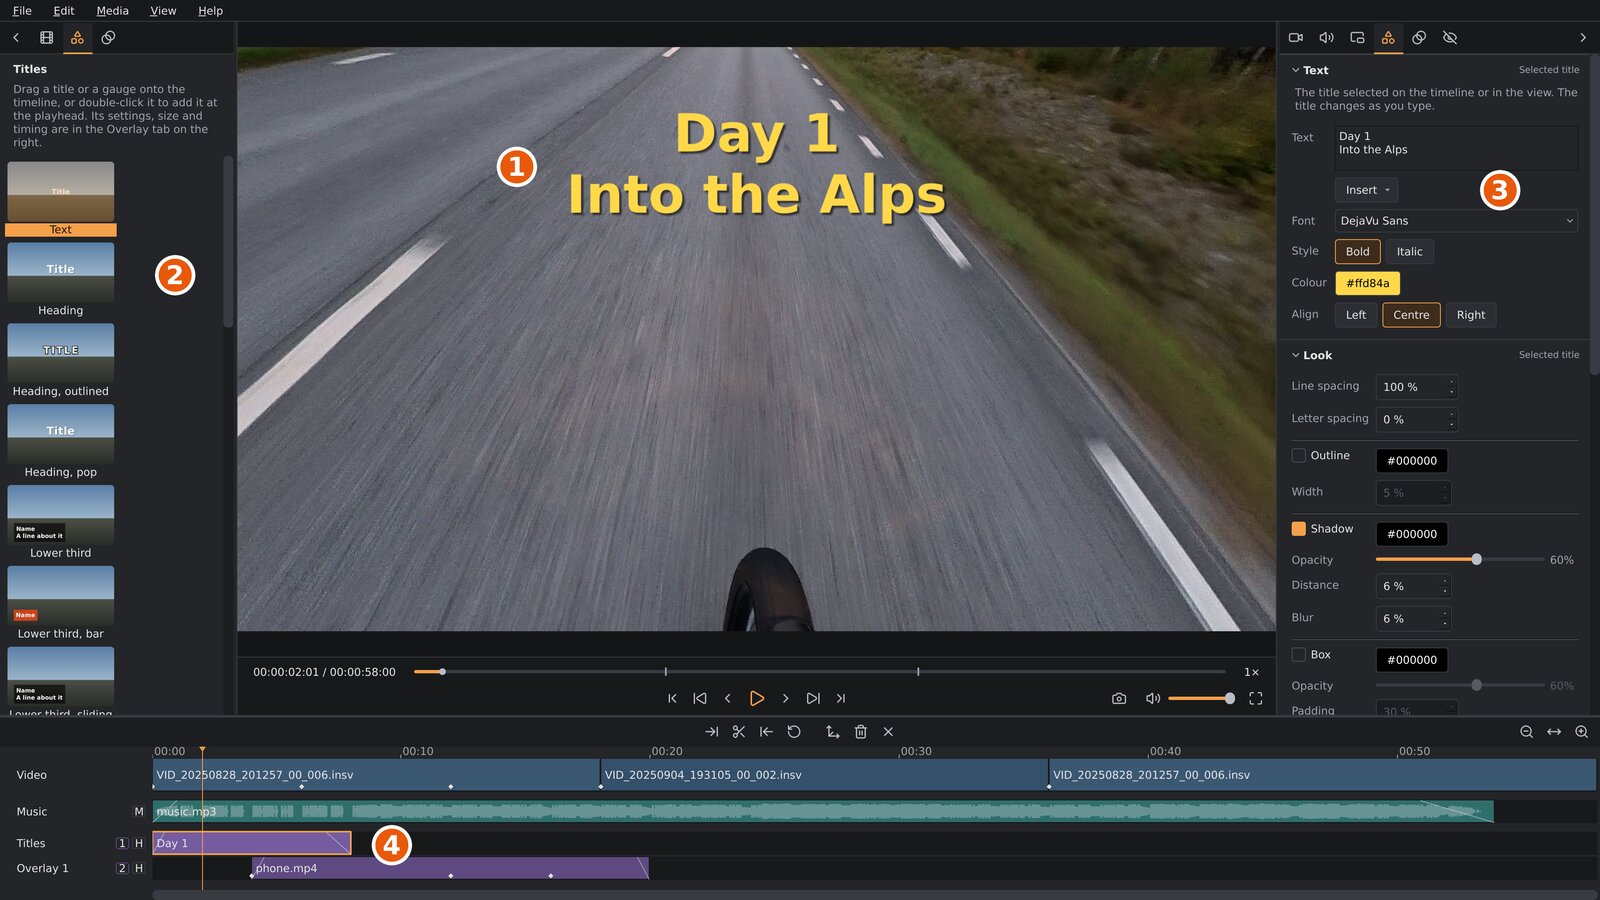
- The title in the viewport. Drag it to move it.
- The media sidebar's Overlays tab, with its Titles tiles.
- The settings sidebar's Overlay tab, with the selected title's text, font, colour and alignment, then how its text is drawn (outline, shadow, box, spacing), and below them how it comes and goes, and its position, size and timing.
- The title on its overlay track.
Adding a title
Open the media sidebar's Overlays tab
( ). The tiles under
Titles are ready-made titles, each showing roughly how and where it
lands in the picture. An animated one plays its animation while the mouse is over it:
| Tile | What you get |
|---|---|
| Text | Title in white bold letters in the middle of the picture. |
| Heading | A big title in the middle, with a soft shadow. |
| Heading, outlined | A big title in spaced-out capitals with a black outline, readable over a bright sky or snow. |
| Heading, pop | The heading, popping up at the start and shrinking away at the end. |
| Lower third | Two lines in the lower left on a dark box: a name, and a line about it. |
| Lower third, bar | One line in the lower left on a solid coloured bar. |
| Lower third, sliding | The lower third, sliding in from the left and back out at the end. |
| Caption | Small text at the bottom in the middle, on a rounded box. |
| Caption, typed | The caption, typing itself on at the start and off again at the end. |
| Date | The date in the lower right. |
| Clock | The time of day in the lower right, running as the clip plays. |
| Date and place | The date and, below it, Place to type over, in the lower left. |
| Speed | The speed in the lower left, running as the clip plays. |
| Speed and altitude | The speed and, below it, the altitude, in the lower left. |
| Direction | The direction of travel at the top in the middle, as a compass point and in degrees, on a rounded box. |
Under them, Gauges draw a value from the GPS or the camera's motion as an instrument (see Gauges):
| Tile | What you get |
|---|---|
| Speedometer | A round dial in the lower right: a needle over the scale, the speed in the middle. |
| Speed bar | The speed in the lower left, over a bar that fills up with it. |
| Altitude bar | The altitude in the lower left, over a bar that fills up with it. |
| Heading tape | The direction of travel at the top in the middle: a compass strip sliding under a marker, the degrees above it. |
| Lean angle | How far the vehicle leans, at the bottom in the middle: a half dial, upright at the top, the degrees and the side in the middle. |
| G-force | The acceleration in the lower left: a dot in a circle, to the side in a bend, up speeding up and down braking, the total in g under it. |
| Route | The road around the camera in the upper right, turning with it so the way it travels is up: the last 20 seconds ridden coloured, the next minute and a half ahead faint. |
To add one:
- drag its tile onto the timeline, onto an overlay track or anywhere under the tracks; or
- double-click the tile (or select it and press
Enter, or right-click it and choose Add to timeline) to add it at the playhead.
The new title lasts 5 seconds. It goes onto the overlay track you dropped
it on if that track is free there; otherwise onto the first overlay track
that is, or a new one. The title is selected and the settings sidebar shows
its Overlay tab ( ),
ready to type the text. There must be a clip on the video track first.
The Date tiles show the day the clip under the title was recorded, as
your computer writes a date in full (in US English, Thursday, August 28,
2025), and the Clock tile the time of day, running as the video
plays. Both come from the camera's clock, as the clip's file records it,
and follow the video: after a cut to a clip recorded on another day, the
date changes with it. In the text they are fields, {date} and {time};
see The recording time as a clock.
orbis-reframe doesn't look up places: type the place yourself.
The Speed, Speed and altitude and Direction tiles show values from the GPS track the camera recorded with the clip, following the video the same way; see Speed, altitude and heading from the GPS. On the tile they show sample values.
A tile is only where a title starts. Once added it is an ordinary title: everything below can be changed, and nothing ties it to its tile.
Text, font, colour and alignment
Select the title on the timeline, or click it in the viewport. The settings sidebar's Overlay tab then shows its settings, in four sections. If the Picture in picture tab is showing, it switches to the Overlay tab by itself (and back again when you select a PiP). The Text section:
| Setting | What it does |
|---|---|
| Text | The title's text. Enter starts a new line. The title changes as you type. |
| Insert | Puts the recording time or date into the text where the cursor is: Time, Time with seconds or Date (see The recording time as a clock); a value from the camera's GPS: Speed, Altitude, Heading in degrees or Heading as a compass point (see Speed, altitude and heading from the GPS); or from its motion: Lean angle or G-force (see Lean and G-force). |
| Clock | Shown while the text has a time in it: how it writes the hours. As the system writes it, 24-hour or 12-hour (AM / PM). |
| Speed in | Shown while the text has a speed in it: km/h or mph. |
| Altitude in | Shown while the text has an altitude in it: metres or feet. |
| Font | The typeface, picked from a list of every font installed on your computer, each shown in its own face. The three fonts you picked last are at the top. Type a name's first letters to jump to it. A project made on another computer may use a font that isn't installed here: it is listed as (not installed), kept, and drawn with a similar font until you pick another. |
| Style | Bold and Italic; click to switch them on or off. |
| Colour | Click to choose the text's colour. |
| Align | Left, Centre or Right: how the lines line up under each other, and which point of the title its position is. A left-aligned title's position is its left edge, so the text keeps its start where you put it as you type more, as a caption in a corner should; a right-aligned one keeps its right edge. Changing the alignment doesn't move the text. |
On the timeline, a title is labelled with its first line.
The recording time as a clock
A title can show when the video under it was recorded: the time of day, or the date, from the camera's clock as the clip's file records it. It is a field in the title's text, which the Insert button below the text puts in where the cursor is, or which you type:
| Field | Shows | Example (US English) |
|---|---|---|
{time} |
The time, hours and minutes | 2:56 PM |
{time:ss} |
The time with seconds | 2:56:48 PM |
{date} |
The date, written in full | Saturday, September 27, 2025 |
The text box shows the field; the picture shows its value. A field can sit
among other text (Leaving camp at {time}), and a title can have several.
To show a brace itself, type it twice: {{ shows as {.
The value follows the video. At every moment it is the recording time of the clip on the video track under the title at that moment, so it keeps running as the clip plays; a trim starts it later, a clip at double speed makes it run twice as fast, and after a cut it jumps to the next clip's time. The time is written as your computer writes it -- 24 hours or AM / PM, as the system's language and region settings say -- unless the Clock setting below the text picks 24-hour or 12-hour (AM / PM). The language setting decides, not a desktop clock's own format: a system set to US English writes 2:56 PM even if the clock in your panel shows 14:56. A title set to 24 or 12 hours looks the same when the project is exported on another computer. The digits are all drawn as wide as each other, so a centred or right-aligned clock doesn't shift as it ticks.
The camera writes the recording's start to the second, not the fraction of a second the first frame began at, so the clock can be up to a second behind the real time.
Where the clip under the title doesn't say when it was recorded (a phone
or action-cam video: the recording time is read only from the 360 cameras
orbis-reframe knows), the time
shows --:-- (--:--:-- with seconds) and the date nothing. The Text
section then says which clips those are.
Speed, altitude and heading from the GPS
The Insta360 X5 records a GPS track in the clip's file while a GPS source is connected to it, such as Insta360's GPS remote; the Antigravity A1 drone records its own. A title can show values from it, as fields like the clock's:
| Field | Shows | Example |
|---|---|---|
{speed} |
The speed over the ground | 72 km/h |
{altitude} |
The height above sea level | 120 m |
{heading} |
The direction of travel in degrees, clockwise from north | 45° |
{heading:compass} |
The direction of travel as a compass point: N, NE, E, SE, S, SW, W or NW | NE |
Each field writes its unit after the number. Speed and altitude are in the units the Speed in and Altitude in settings below the text pick (km/h or mph, metres or feet), saved with the title. A new title starts with the units your computer's region uses: miles and feet where it measures in imperial units, else kilometres and metres.
The values follow the video like the clock: at every moment they come from the clip under the title at that moment, through trims, speed changes and cuts. The camera fixes its position about once a second; between two fixes the values run smoothly from one to the next, so a speed counts up or down instead of jumping. Numbers are whole: the speed in km/h or mph, the altitude in metres or feet, the heading in degrees. Below a walking pace the speed shows 0, so a bike standing still doesn't flicker between 0 and 1. While standing still the GPS doesn't know a direction: the heading keeps the last one it had.
The camera's GPS reaches the video a second or two late. On an Insta360 X5 clip orbis-reframe lines it up with the camera's own motion sensor: when you speed up or brake, the speed changes on the picture's moment. A clip where you stood still or kept a steady speed throughout has nothing to line it up by, and its values can run up to about 2 seconds behind.
The GPS is read from a clip's file the first time a title or gauge needs
it, in the background: on a long clip the values can take a second or two
to appear (until then they show --). An export or a screenshot waits for
them.
Where there is no GPS, a field shows -- with its unit (-- km/h):
- a clip from a camera or phone that orbis-reframe reads no GPS from;
- a clip recorded without a GPS source connected;
- an Antigravity A1 clip where the drone hovered, or one shorter than about 8 seconds: the GPS can't be lined up with the video;
- a stretch where the camera lost the signal for more than about 3 seconds, in a tunnel for example. The GPS track can also start a moment after the video, or stop a moment before it.
The Text section then says which clips under the title have no GPS there, or have it for only part of the time.
Lean and G-force
The camera's motion sensor records how it turns and accelerates, GPS or not. From it, a title can show how far the vehicle leans and the G-force it feels, as fields like the GPS's:
| Field | Shows | Example |
|---|---|---|
{lean} |
How far the vehicle leans from upright, in whole degrees, and to which side: L or R | 24° R |
{g} |
The total G-force in the level plane, braking, speeding up and cornering together, in g | 0.42 g |
They follow the video like the GPS fields. The camera needn't face the way you ride, and on a stick it often doesn't: orbis-reframe finds the direction of travel in each clip from how the camera tilts as the vehicle turns, and measures the lean about it and the G-forces along and across it. The values are smoothed a little (the lean over about a quarter of a second, the G-force over about half a second), so a stick's shake doesn't show. Upright is the camera's average posture over the clip.
A clip that hardly turns gives nothing to find the direction of travel
by. There the G-force shows -- g, since forward could point any way;
the lean still shows. An Insta360 X5 timelapse records which way the
camera pointed but no acceleration, so it shows the lean and -- g. A
clip from a camera orbis-reframe reads no motion from shows -- in both.
The Text section then says which clips those are.
Gauges
A gauge draws a value as an instrument: a Dial with a needle over a scale and the number in the middle, a Bar with the number over a bar that fills up along a scale, a Heading tape, a compass strip that slides under a marker as the direction of travel changes, with the degrees above it, a Lean dial, a half dial upright at the top with the lean's degrees and side in the middle, a G circle, a dot that moves across the circle with the acceleration (right in a right-hand bend, up speeding up, down braking) over the total in g, or a Route. Add one from the Gauges tiles of the Overlays tab like a title. It is a clip on an overlay track like a title, and follows the video the same way: the value is the one a title's field shows at that moment, the number rounded the same, and the needle, bar, tape or dot moves smoothly.
A Route is a map drawn from the GPS track, seen in one of two ways (its View):
- Ahead, as added: the road around the camera on a round face, turning
as you ride so the way you travel is always up. An arrow below the
middle is the camera; behind it the last 20 seconds ridden, in the
accent colour; ahead of it, faint, the road you'll ride in the time
Ahead sets (a minute and a half when added). The map zooms out at
speed and in when slow, gently, so it doesn't pump with every bend. An
N on the rim points north. The direction comes from the road over
a few seconds, not the GPS's course of the moment, so the map turns
smoothly; standing still it keeps the way you came. The road ahead
ends where the clip does: after a cut you're somewhere else. Where the
clip under it has no GPS the face shows
--. - Whole trip: every clip on the timeline that has a GPS track, the part of it each clip uses, in a square seen from above with north up and its shape kept. The route is drawn faint, the part ridden up to this moment in the accent colour, and a dot marks where the camera is. Clips are drawn separately, so a cut doesn't draw a line across the map; a clip with no GPS is left out, and over it the dot is hidden. Clips recorded far apart share the square, so each becomes small.
A route shows where you rode, and so where you started or live: think about that before you share the video.
Selecting a gauge shows its Gauge section in the Overlay tab, in the place of Text and Look:
| Setting | What it does |
|---|---|
| Kind | Dial, Bar, Heading tape, Lean dial, G circle or Route. Changing to a kind that shows something else sets a scale that suits it. |
| Shows | For a dial or a bar: Speed or Altitude. Picking the other sets a scale that suits it. |
| Unit | km/h or mph for a speed, metres or feet for an altitude. The scale's ends are converted to it. A new gauge starts with the units your computer's region uses. |
| Scale from / Scale to | For a dial or a bar: the scale's low and high end, in the unit. A new speed gauge goes to 200 km/h (120 mph), an altitude gauge to 1000 m (3000 ft). A value past an end puts the needle or bar at that end; the number still shows the value. |
| Scale (±°) | For a lean dial: how far it reaches either side of upright, 60° when added (5° to 90°). A lean past it shows at the end; the number still shows the lean. |
| View | For a route: Ahead or Whole trip (see above). |
| Ahead | For a route seen ahead: how much of the road ahead it shows, in seconds of the video, 30 s to 5 minutes. The map's scale follows the distance you cover in that time. |
| Scale (g) | For a G circle: the G-force at the circle's edge, 1 g when added (0.1 g to 5 g). A force past it puts the dot on the edge, the way it points; the number still shows it. |
| Accent | The colour of the needle, the bar, the tape's marker, the G circle's dot, and the route's arrow or dot and the part of it ridden. |
| Face and Face opacity | The colour behind the gauge, and how solid it is. At 0 % only the scale and the numbers sit over the picture. |
| Text | The colour of the scale and the numbers. |
Where the clip under it has no GPS (for a lean dial or a G circle, no
motion; for a G circle, also no direction of travel, see Lean and
G-force), a gauge stays empty and its number shows
--; the Gauge section then says which clips those are. A route
with no GPS on the whole timeline shows only --. Its
Animation works as a title's, without typing on or off, and its
Position and timing too, except that its Size is the gauge's
height, as a percentage of the picture's height.
Outline, shadow, box and spacing
The Look section draws more than the letters, to keep a title readable over a bright sky or a busy road. Sizes are a percentage of the text size, so the look stays the same when you make the title bigger or smaller.
| Setting | What it does |
|---|---|
| Line spacing | The space from one line to the next: 100 % is the font's own, more spreads the lines apart. |
| Letter spacing | Space added between the letters; below 0 brings them closer. |
| Outline | A line round each letter, in the colour on the button beside it (click it to choose). Width: how thick. |
| Shadow | A soft shadow below and to the right of the text (and of its outline), in its colour. Opacity; Distance: how far it falls from the text; Blur: how soft its edge is, 0 % for a sharp one. |
| Box | A filled box behind the text, in its colour. Opacity; Padding: the room between the text and the box's edge; Corners: how round its corners are, 50 % for round ends. |
Each can be switched on and off with its tick box; switched off, it keeps its settings for when you switch it on again. With a box, a left- or right-aligned title's position is the box's edge.
Sliding, popping and typing in and out
The Animation section sets how the title comes on at its start and goes off at its end:
| Setting | What it does |
|---|---|
| In | Slide in from the left, right, top or bottom: the title starts just outside that edge of the picture and slides to its place, slowing down as it arrives. Pop up: it grows from nothing, a little past its full size, and settles. Type on: its text appears letter by letter, evenly over the length. None: it is simply there. |
| Length | How long coming on takes, in seconds. |
| Out | The same backwards: Slide out to the left, right, top or bottom, speeding up as it leaves, Shrink away, or Type off, taking the letters away from the end. |
| Length | How long going off takes. |
The animation is tied to the title's start and end, so it stays right when you make the title longer, shorter or move it. It adds to everything else: a title with keyframes slides in to where its keys put it, and a fade in fades it in as it slides. If the title is shorter than both lengths together, each takes its share of the title's time.
While a title types on, the letters already typed stay where they are in the finished text, and a line being typed grows from the side its Align names: from the left edge, out from the middle, or leftwards from the right edge. Spaces and line breaks count as letters. A box behind the text is there at its full size from the start, and the outline and shadow come with each letter.
Splitting a title keeps its In on the first part and its Out on the second.
Position, size, keyframes and fades
The Overlay tab's Position and timing section. These work as for a picture in picture (Picture in picture):
- Position X and Position Y: where the title is, as a percentage of the picture's width and height: across, its left edge, middle or right edge, as its Align says; down, its middle. Or drag the title in the viewport; dragging it while it slides moves where it slides to.
- Text size: how tall the letters are, as a percentage of the picture's height. 8 % is a good size for a heading; the box around the text grows with the text, so typing more doesn't make the letters smaller.
- Opacity: 100 % is solid.
- Keyframes: with Set key (
K) a title can move, grow, shrink or fade during its clip, exactly like a PiP (Moving a picture in picture during a clip). Its text and how it's drawn stay the same for the whole clip. - Fade in / Fade out and Start: as for a PiP.
- Duration: how long the title shows, in seconds. Its start stays put and its end moves.
A title has no corners or border settings, and no sound.
To make a title longer or shorter, set its Duration, or drag its ends on the timeline. Trimming, splitting, moving it to another overlay track, hiding its track and the layer order all work as for a PiP clip (The timeline, Several overlays).
Titles and gauges appear in playback, screenshots and the export exactly as in the viewport. They are drawn at the export's resolution, so they stay sharp in a 4K export.