The manual of orbis-reframe 0.10.1, the newest release. What has changed since is in the development version on GitHub.
The main window
This page is a tour of orbis-reframe's window: what each part is called, what it's for, and which chapter covers it in detail. The later chapters use the names from here.
Without a project open, the window shows the project library, your projects as cards; see Projects and export. With one open, it looks like this:
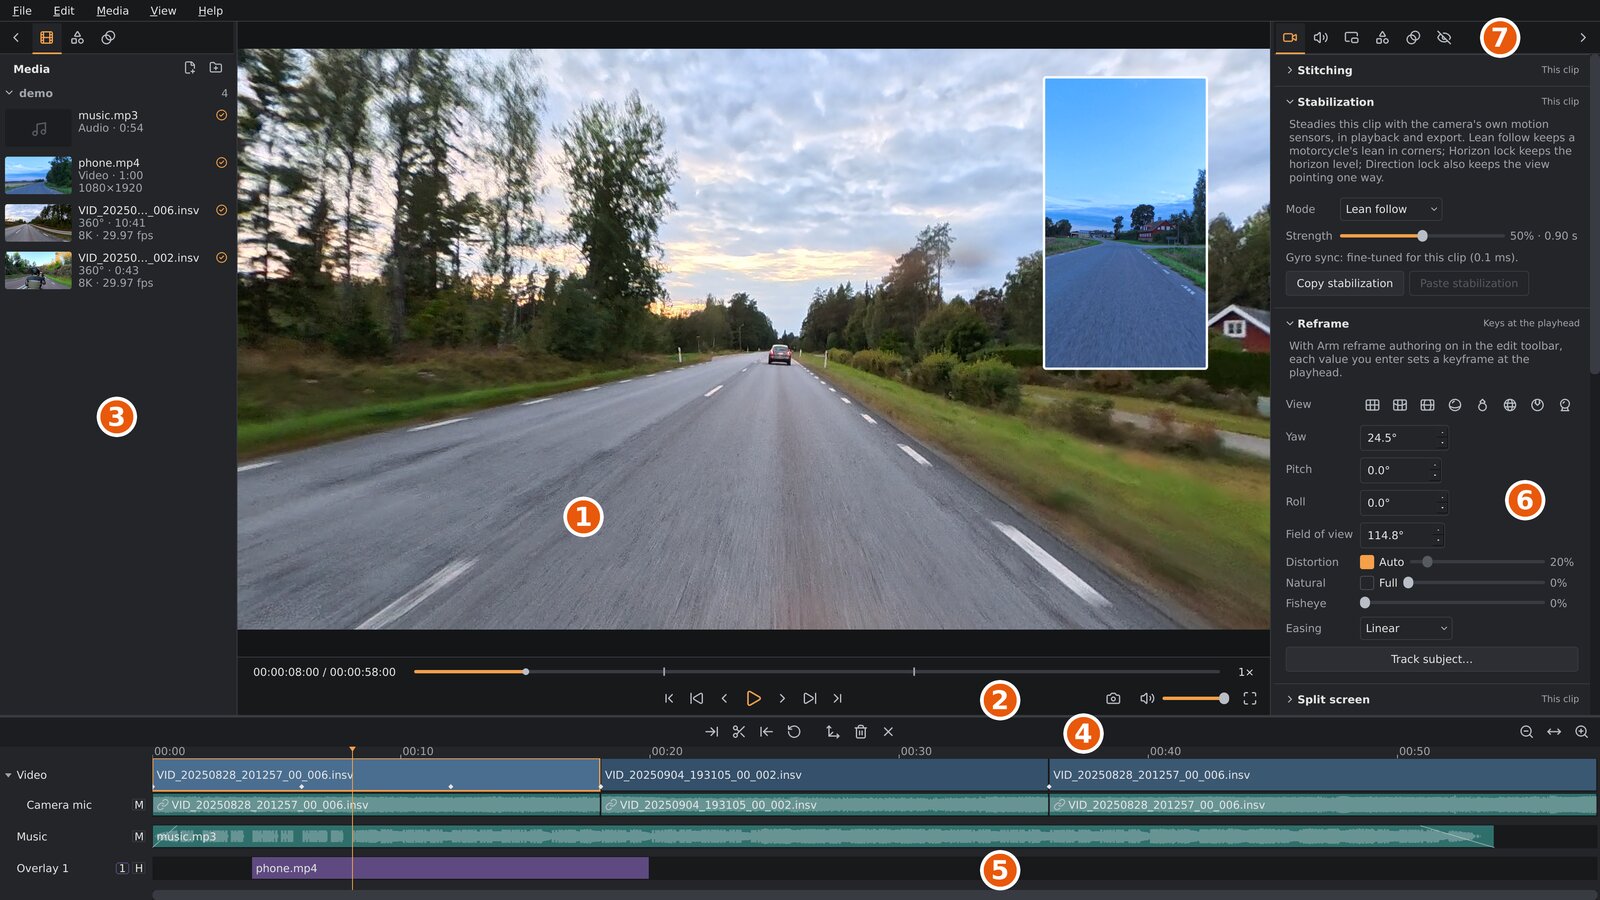
- The viewport: the picture.
- The player bar, for watching: play, step, jump, the progress bar, speed, volume and full screen; see The player bar.
- The media sidebar, with the project's media and the titles; see The media sidebar.
- The edit toolbar: trim, split and keyframe buttons, and the timeline's zoom.
- The timeline: your clips, overlays and audio, in time order.
- The settings sidebar, here on its Video tab.
- The settings sidebar's tabs.
The title bar shows the project's file name, or untitled for a project
that hasn't been saved yet. A * after the name means there are unsaved
changes.
The viewport
The viewport shows the video as your export will look: a flat picture cut out of the 360° sphere. Its shape follows the project's aspect ratio (16:9, 9:16, 1:1 or 4:3, set in File ▸ Project settings…), so what you frame here is what you get.
| To | Do |
|---|---|
| Look around | Drag with the left mouse button. |
| Zoom in or out (narrower or wider view) | Turn the mouse wheel. |
| Move an overlay (a picture in picture or a title) | Drag it. The pointer changes to a four-way arrow over one. |
| Remove a privacy blur | Right-click it. See Privacy blur. |
Looking around only changes what you see right now. To make the export follow a view, you set reframe keyframes, covered in Reframing.
The media sidebar
The sidebar on the left of the viewport holds what you put on the
timeline, on four tabs: Media ( ),
the files you work with, Overlays (
 ),
ready-made titles to put over the video (see Titles), Transitions
(
 ), to go
over from one clip to the next at a cut (see Transitions), and
Effects (
 ), to
change the look of a clip, such as a vignette (see Effects). The icons along its
top pick the tab. The
< button at its top-left closes the
sidebar and leaves a slim strip at the window's edge; the > button on the
strip opens it again. Ctrl+B does both. To make it wider or narrower,
for example to read long file names, drag its right edge (the pointer
becomes a two-way arrow there); double-click the edge to go back to the
default width. orbis-reframe remembers whether it was open and how wide.
Media lists the project's media: every file you've imported, and every file used on the timeline. The files stay where they are on your disk; the project only remembers where they are. The list is grouped by the folder each file is in, and sorted by name. Each file shows a small picture, its name, its kind (360°, Video or Audio) and length, and its resolution and frame rate. A 360° clip's resolution is the camera's recording mode (8K, 5.7K, ...), as in Media information; a clip whose mode the app doesn't know, or can't read because the file is missing, shows the size of its lens pictures (3840×3840). An orange check mark in a circle, to the right of the name, means the file is used on the timeline. A file that can't be found any more is shown in red with File not found; this follows the disk while the app runs, so a file that's put back, or a drive that's plugged in again, turns normal again by itself. So does the card of a file that couldn't be read, once a good copy replaces it. Click a folder's name to fold it away.
| To | Do |
|---|---|
| Add files | Media ▸ Import files… (Ctrl+I), the first button at the top of the tab ( ), or drag files from your file manager onto the list. |
| Add everything in a folder | Media ▸ Import folder…, the second button ( ), or drag the folder onto the list. Every video and audio file directly in it is added (not its subfolders). |
| Watch a file before putting it on the timeline | Click the play button on its picture (it shows when the mouse is over the file), or select it and press Space. See Previewing a file. |
| Put a file on the timeline | Drag it onto the timeline, or double-click it. A 360° clip goes onto the video track, a video onto an overlay track as a picture in picture, an audio file onto an audio track; see The timeline. You can select several files and drag them together. |
| Remove a file from the project | Right-click it and choose Remove from project, or press Delete. The file itself isn't deleted. A file used on the timeline can't be removed. |
| Find a file on disk | Right-click it and choose Show in file manager. |
| Find a moved or renamed file | Double-click it (it's red, File not found), or right-click it and choose Locate file…, and pick where it is now. See Projects and export. |
Importing is part of the project, so Edit ▸ Undo takes it back like any
other edit. The .lrv preview files the camera writes next to each .insv
aren't listed.
Previewing a file
To see what's in a file before you put it on the timeline, click the play
button on its picture in the Media tab, or select it and press Space.
The viewport shows the file instead of the timeline and plays it with its
sound; a line over the player bar says Previewing and the file's name, and
the file's picture has an orange frame and keeps its button (a pause button
while it plays). The timeline stays as it was, its playhead where you left
it.
While a file plays this way:
- the player bar and its keys work in the file: play and pause (
Space, or the button on the file's picture again), the progress bar, one frame or one second back and forward, its start and end (Home/End, and↑/↓: a file has no cuts), and its highlight marks (Ctrl+↑/Ctrl+↓); - the file's highlight marks are yellow dots on the progress bar: a 360°
clip's marks set while recording, and your own.
Madds one at the playhead andShift+Mdeletes the one there (one set while recording is hidden), as on the timeline; click a dot to go to it, right-click it to delete or hide it, and right-click the progress bar for Show hidden marks. They're the file's: putting it on the timeline gives the clip a copy of them, and a clip already on the timeline keeps its own. A video takes marks too, an audio file doesn't; - drag in a 360° clip to look around, and turn the mouse wheel to zoom. That's only looking: it sets no keyframes, even with reframe authoring armed;
- a 360° clip is stitched and stabilized as it would be if you put it on the timeline now (with the stabilization of the last 360° clip on the timeline; none if there isn't one), but without colour or a split screen: those are set on a clip, once it's on the timeline;
- Media information in the settings sidebar shows the file previewed (Media information);
- a video shows as it would as the only clip on the video track, fitted into the project's picture; an audio file plays with a black picture.
To go back to the timeline, click Back to timeline on the line over the
player bar, press Esc, or click the timeline. Anything you do to the
timeline -- putting the file on it with a double-click or a drag, a trim, a
keyframe (K), undo of a change to the timeline -- also goes back to it
first or right after, so you always see what you changed. Undoing a mark
you set in the file keeps it previewed. The view, and the playhead, are
where they were before the preview. Of a preview, only the file's marks are
saved in the project.
The timeline
Under the viewport and both sidebars, across the whole width of the window,
is the timeline: your edit, from left to right in time. To give it more or
less room, drag the line between it and the viewport up or down;
orbis-reframe remembers the height. Until you do, the timeline is as tall
as its tracks need. When the tracks don't fit, scroll them up and down with
the mouse wheel over the track names, Shift + the mouse wheel anywhere
on the timeline, or the scroll bar at its right edge; the ruler stays in
place.
From top to bottom it has:
- the ruler, with the time. Click or drag on it to move the playhead, the vertical line that marks the frame shown in the viewport;
- the video track: your
.insvclips, one after another, with a hard cut between each pair; - the video clips' sound, on the Camera mic track (and External mic, when an external microphone was connected);
- any other audio tracks: music, or sound from an external recorder;
- any overlay tracks: videos shown as picture in picture (PiP) over the 360° video, and titles, each track with its sound on a track right under it.
A little space separates these three groups: the video and its sound, the audio tracks, the overlays. A click on the Video track's header folds its sound tracks away and brings them back; an overlay track has a triangle for its audio track.
Clicking a clip selects it. It doesn't move the playhead: only the ruler and the player bar's progress bar do that. The timeline explains how to arrange, trim, split and speed up clips.
The player bar
The bar directly under the viewport is for watching. It has two rows.
On top, from left to right:
- The time: where the playhead is, and the length of the timeline, as
hours:minutes:seconds:frames (
00:01:23:14is 1 minute, 23 seconds and 14 frames), counted at the project's frame rate. Click it (or pressCtrl+G) to type a time and pressEnterto jump there: as shown, or shorter --1:23is 1 minute 23 seconds,83.5is 83½ seconds.Escgives up. - The progress bar: the whole timeline from start to end, however far the timeline below is zoomed in. Click it to jump, or drag along it to scrub, just like the ruler. The small ticks are the cuts between clips. Hover over it to see the time under the pointer. While a file from the Media tab previews, it's that file's, with its highlight marks as yellow dots.
- The speed:
1×normally. Click it to play slower or faster, from0.25×to2×, or pressJ(slower) andL(faster;Lalso starts playback). It's only for watching -- the export is never affected (to speed up a clip in the video, see The timeline). The sound plays at1×only; at any other speed the preview is silent. At2×a computer that only just plays the clip in real time may skip frames.
Below, in the middle, the playback buttons, each doing what its key does:
| Button | What it does |
|---|---|
  To start / to end |
To the start / end of the timeline (Home / End). |
  Previous / next cut |
To the previous / next cut or clip edge (↑ / ↓). |
  One frame back / forward |
Steps one frame and pauses (← / →). Hold the button to keep stepping. |
 Play / pause |
Starts or stops playback (Space). |
On the left, Buffering… shows while the video loads. On the right:
| Button | What it does |
|---|---|
 Screenshot |
Saves the frame the viewport shows (the frame at the playhead) as a PNG (Ctrl+Shift+P); see Screenshots. |
 Volume and mute |
How loud the preview plays, and the speaker button to mute it. Only what you hear while editing: the export and the clips' own volume (the Audio tab) don't change. orbis-reframe remembers the volume for the next time. The sound plays on your desktop's default output; to move it to another, use the desktop's sound settings or pavucontrol. |
 Full screen |
Shows only the picture and the player bar, over the whole screen (F11, or double-click the picture). The player bar hides when the mouse rests and comes back when you move it. Esc or F11 leaves full screen. |
Hover over a button to see its name and shortcut.
The edit toolbar
The strip directly above the timeline holds the editing tools that act at the playhead, in the middle of the window. From left to right:
| Button | What it does |
|---|---|
 Set trim in |
Cuts the start of a clip off at the playhead ([). |
 Split |
Cuts the clip in two at the playhead (S): the selected audio or overlay clip, otherwise the video clip. |
 Set trim out |
Cuts the end of a clip off at the playhead (]). |
 Restore |
Gives the clip back its full length (R). |
 Arm reframe authoring |
While on, every drag or zoom in the viewport sets a reframe keyframe at the playhead (A). |
 Delete keyframe |
Deletes the reframe keyframe at the playhead (Shift+K). |
 Delete all keyframes |
Deletes every reframe keyframe of the clip under the playhead (Ctrl+Shift+K). |
At its right end are the timeline's zoom buttons:
| Button | What it does |
|---|---|
 Zoom out |
Shows more of the timeline (Ctrl+-). |
 Zoom to fit |
Shows the whole edit across the timeline (Ctrl+0). |
 Zoom in |
Shows less of the timeline, in more detail (Ctrl++). |
Hover over a button to see its name and shortcut.
Left of the zoom buttons, short messages appear: what the program is doing, or why something you tried didn't work (for example "Move the playhead into the selected clip to trim it"). Hover over a message that doesn't fit to read all of it.
The settings sidebar
The sidebar on the right of the viewport holds the settings, sorted by
subject into six tabs. The icons along its top pick the tab; hover over one
to see its name. Alt+1 to Alt+6 pick the tabs from left to right; the
key of the tab that's already showing closes the sidebar.
| Tab | What it sets |
|---|---|
 Video |
Everything about the picture, in the order you'd usually work: Stitching (how the camera's two lenses are joined into one picture), Stabilization (smoothing out camera shake, keeping the horizon level), Reframe (the view: angles, field of view and distortion, keyframes and their easing, and Track subject, which follows a person or vehicle automatically), Split screen (the clip in two or four panes, each looking its own way; see Split screen), Colour (exposure, contrast, saturation and other colour corrections), Effects (the clip's effects, such as a vignette, and their settings; see Effects) and Media information (details of the clip's file, read only; see Media information). |
 Audio |
A section per audio clip: the selected one, or all of a video or PiP clip's sound (Camera mic, External mic). Noise and wind reduction, its volume and its track's, fades. See Audio and noise reduction. |
 Picture in picture |
Size, position and look of the selected PiP clip. |
 Overlay |
The selected title's text, font, colour and alignment, its look (outline, shadow, box, spacing), how it slides, pops or types in and out, and its position, size and timing; for a gauge, its kind, units and look in the place of the text and look. See Titles. |
 Transition |
The selected transition's length. See Transitions. |
 Privacy |
Blurring number plates. |
Each tab is made of sections, such as Stabilization or Colour. Click a section's title to fold it away to just its title row, and again to open it. Stitching and Media information start folded, since you rarely need them. orbis-reframe remembers which sections you've opened or folded. When a tab's sections don't fit in the window, the tab scrolls.
Like the left sidebar, the > button at the top-right closes the settings
sidebar and leaves a slim strip at the window's edge, whose < button opens
it again; Ctrl+Shift+B does both. Drag its left edge to make it wider or
narrower; double-click the edge to go back to the default width.
orbis-reframe remembers whether it was open, how wide, and which tab was
showing.
Which clip a section changes. The right end of each section's title row says what the section applies to:
| It says | Meaning |
|---|---|
| This clip | The selected video clip if you've clicked one, otherwise the clip under the playhead. Stitching (shared by every clip of the same file), Stabilization, Colour, Privacy, Audio (the clip's sound) and Media information. |
| Selected audio clip | The Audio tab's sections, when you've selected an audio clip on an audio track. |
| Selected PiP clip | The Picture in picture section, and the Audio tab's sections for its sound: the PiP you've selected. |
| Keys at the playhead | The Reframe section: the view at the playhead, and the keyframe there. |
The project's output format (aspect ratio, resolution, frame rate and bit depth) isn't in the sidebar: it's in File ▸ Project settings…, see Projects and export.
Menus
| Menu | Contains |
|---|---|
| File | New project, open project, back to the project library; save, save as; Project settings… (the output format); export, quit. (Screenshots are in the player bar.) |
| Edit | Undo (Ctrl+Z) and Redo (Ctrl+Shift+Z). Undo steps back through your edits to the project; looking around in the viewport isn't an edit and isn't undone. Add mark (M) and Delete mark (Shift+M): a highlight mark at the playhead. |
| Media | Import files… (Ctrl+I) and Import folder…, into the project's media (above); Add clip to timeline… (Ctrl+Shift+A), Add audio file… (Ctrl+Shift+M) and Add picture in picture… (Ctrl+Shift+V), straight onto the timeline; Add audio track and Add overlay track. Calibrate camera lenses… measures your camera's lenses with a chart on your monitor; it needs no project, so it's there in the project library too (see Stitching). |
| View | Preview size: how large the preview in the viewport is stitched when the graphics card can't draw it straight from the lenses. It changes only what you see while editing, never the export; see Stitching. Theme: the app's colours -- Ember (dark grey with an orange accent, the default), Light, or Neutral dark (dark grey with a blue accent). It changes at once and is remembered; the area around the picture stays dark in every theme, so the picture's brightness is judged the same way. |
| Help | User manual opens this manual in your web browser, on GitHub: for a release, the copy that matches your version. Keyboard shortcuts (F1), and About orbis-reframe, with the version and the diagnostics to include in a problem report. |
When you close the window, open another project or go back to the project
library with unsaved changes,
orbis-reframe asks whether to save them first: Save (S or Enter),
Discard (D) or Cancel (Esc).