The manual of orbis-reframe 0.10.1, the newest release. What has changed since is in the development version on GitHub.
Transitions
At a cut, one clip normally gives way to the next at once. A transition makes the change gradual. There are two kinds:
- Crossfade: the two clips blend: for a moment both show, the first fading out as the second fades in.
- Dip to black: the first clip fades out to black, then the second fades in from black.
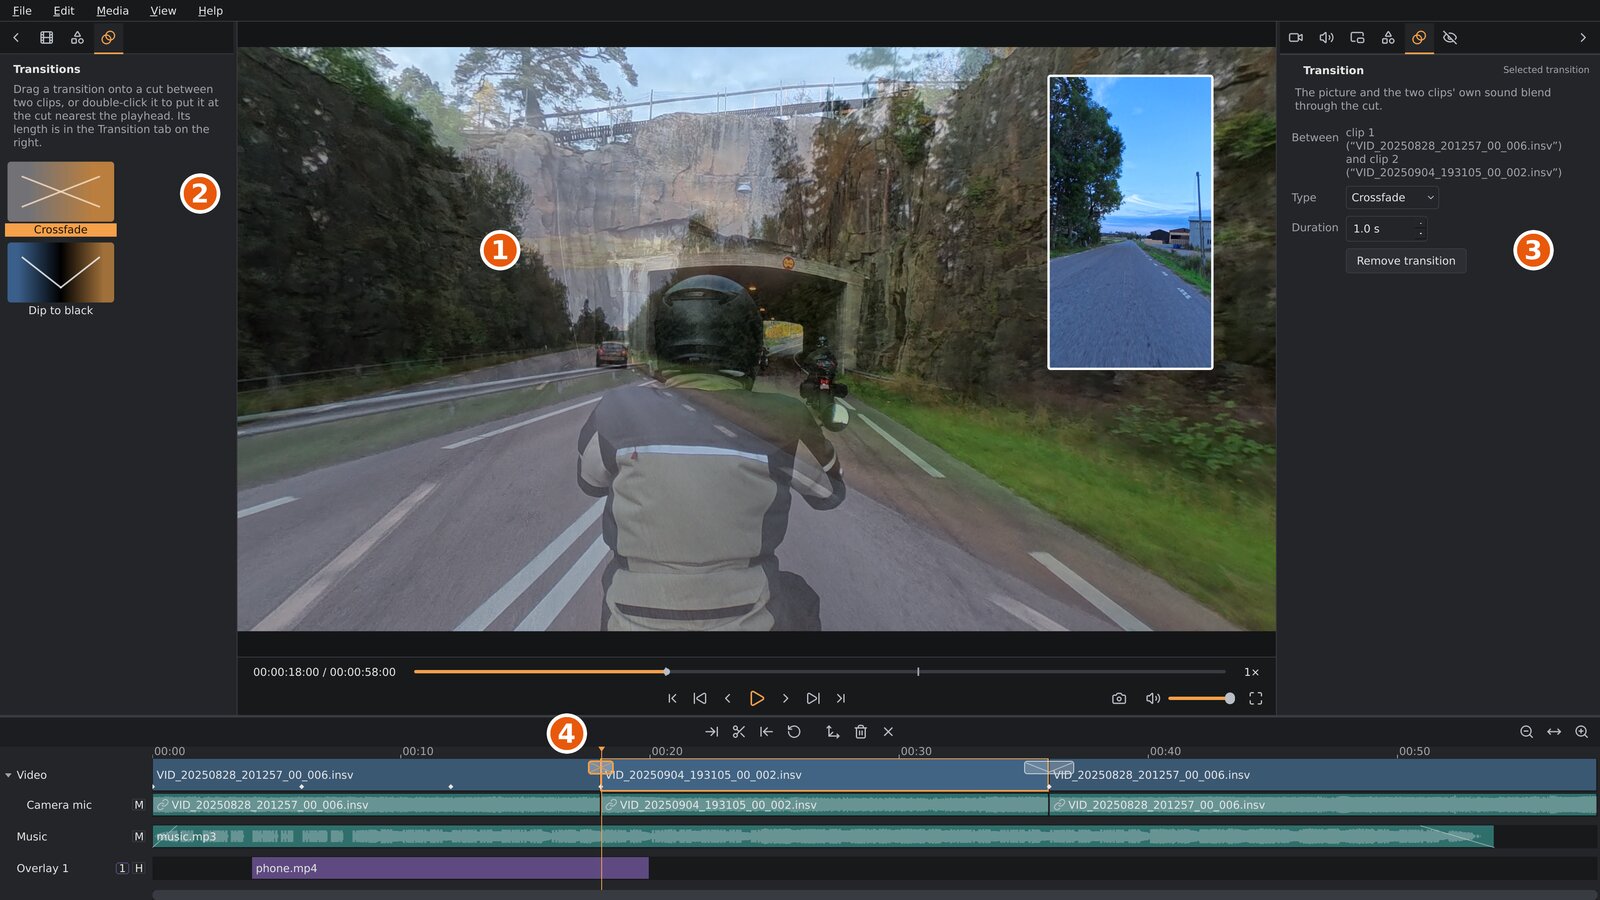
- The picture halfway through a crossfade: both clips at once.
- The media sidebar's Transitions tab.
- The settings sidebar's Transition tab, with the selected transition's settings.
- The crossfade on its cut: a box as long as the blend, crossed. The dip to black on the next cut has a V instead.
Adding a transition
Open the media sidebar's Transitions tab
( ), then:
- drag Crossfade or Dip to black onto the video track: it goes on the cut nearest to where you drop it; or
- double-click it (or select it and press
Enter, or right-click it and choose Add at the nearest cut) to put it on the cut nearest the playhead.
A transition needs a cut, so there must be two clips on the video track
at least. A cut has one transition: putting another on it changes its
kind and keeps its length. A new transition lasts 1 second. It is selected, and the settings
sidebar shows its Transition tab
( ).
How it works: footage past the cut
A transition is centred on the cut, and the clips stay where they are: the timeline doesn't get any shorter.
A dip to black needs nothing more: the first clip fades out over the half before the cut, the second fades in over the half after it, each within what you kept of it. It works on any cut.
A crossfade shows both clips at once, so it needs more of them. A 1-second crossfade plays the first clip on for half a second past its end, and starts the second clip half a second before its start. That footage comes from what you trimmed off.
So a crossfade works best between clips you have trimmed at the cut. If there's less footage than that past the cut, the crossfade is shorter; if there's none, for example at the very end of a recording, it doesn't play at all and the cut stays hard. Its box on the timeline is then small and marked with !, and its tooltip and the Transition tab say why. They name the clip by its place on the video track as well as its file (clip 1 is the first), since clips cut from one recording share a file name. Trim that clip shorter at the cut to make room. Either kind is also never longer than its clips allow: at most half of the shorter one, so the transitions at a clip's two ends never meet.
On a clip with a different speed, the footage it uses is at that speed too.
Settings
Click a transition's box on the timeline to select it. The settings sidebar's Transition tab then shows:
| Setting | What it does |
|---|---|
| Between | The two clips it joins. |
| Type | The kind of transition: Crossfade or Dip to black. Changing it keeps the duration. |
| Duration | How long it takes, centred on the cut: 0.1 to 10 seconds. If there isn't enough footage past the cut for all of a crossfade, or a clip is too short, a line under it says how long it plays. |
| Remove transition | Back to a hard cut. Delete does the same, as does Remove transition in the box's right-click menu. |
What changes
- The picture. Each clip looks as it does on its own: its own reframe view, stabilization, colour grade, stitching and privacy blur. In a crossfade, the first clip's view past its end is where its last reframe keyframe looks. A split clip (Split screen) blends in or out as its whole split picture. Overlays and titles stay on top: a dip to black doesn't darken them.
- The clips' own sound. In a crossfade the first clip's sound fades out while the second clip's fades in, over the whole transition. In a dip to black it follows the picture: the first fades out up to the cut, the second fades in after it. Music and other audio on their own tracks isn't changed.
Transitions show in playback, screenshots and the export alike. While playing, a crossfade between two 360° clips decodes both at once, which needs both on the graphics card at once. Each clip's frames for the crossfade come from the same decode that plays it -- the next clip's started half the crossfade early, the previous clip's carried on half the crossfade past the cut -- so that takes little more than playing on into the next clip does. On a card without room for two clips, the crossfade's other clip is decoded on the processor, which takes the processor's time while it plays.
Transitions and edits
A transition belongs to its cut:
- Trimming a clip at the cut changes how much footage there is past it, and with it how long a crossfade plays.
- Splitting or duplicating the clip before the cut keeps the transition on the same cut.
- Moving a clip away from the cut, putting another clip into it, or removing either clip removes the transition.
Undo brings it back like any other edit.
Privacy blur
With Blur number plates on, the footage a crossfade shows past the trims has to be scanned too (a dip to black shows none). Scan clip in the Privacy tab covers it; if you add or lengthen a crossfade after scanning, scan the clip again, or the export refuses it (see Privacy blur).