The manual of orbis-reframe 0.10.1, the newest release. What has changed since is in the development version on GitHub.
Picture in picture
A picture in picture (PiP) is an ordinary flat video shown in a small frame over your 360° video. Use it for a second camera, such as a phone on the handlebars, an action camera pointing at the rider, or a screen recording of your route.
A PiP is one kind of overlay: anything on an overlay track. The other kind is a title (Titles).
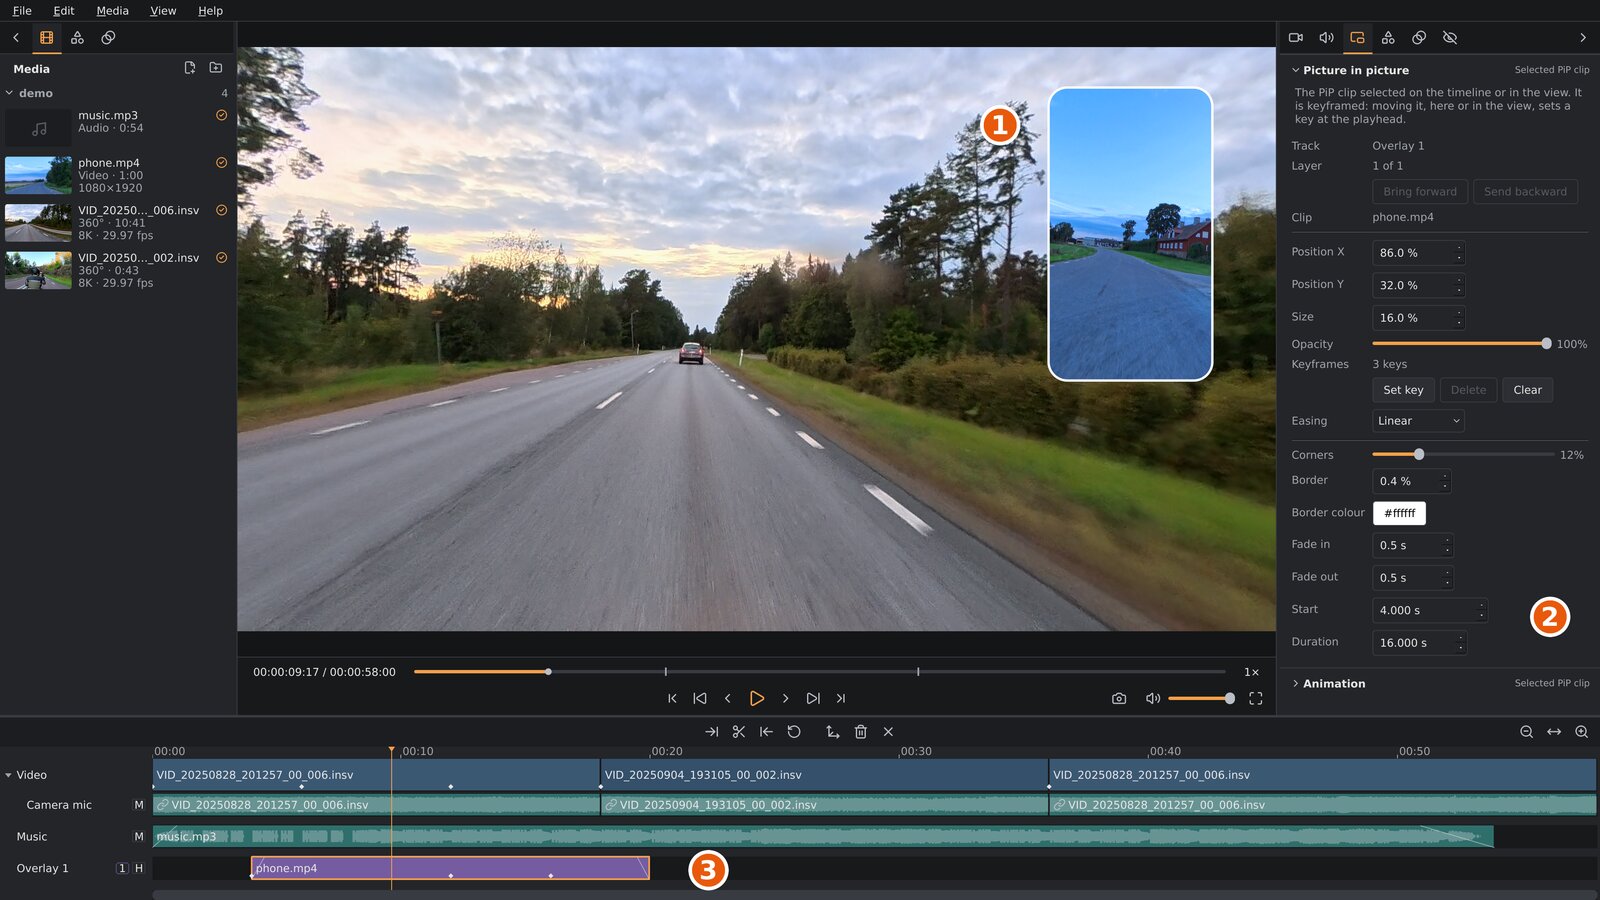
- The PiP in the viewport. Drag it to move it.
- The settings sidebar's Picture in picture tab, with the settings of the selected PiP.
- The PiP clip on its overlay track. The white diamonds are its keyframes.
Adding a picture in picture
PiPs go on overlay tracks, the lowest tracks on the timeline. Add one with Media ▸
Add picture in picture… (Ctrl+Shift+V), by right-clicking the timeline and
choosing Add PiP here…, or by dragging video files from the
Media tab or your file manager onto the timeline. A PiP takes .mp4, .mov, .mkv,
.m4v, .webm and .avi files. More about overlay tracks (moving,
trimming, splitting, hiding a track) is in The timeline.
To use a flat video as the main picture instead of a small frame, put it on
the video track (Flat videos on the video track).
For text over the video, see Titles: titles go on overlay
tracks too, and most of this chapter applies to them.
A new PiP starts in the lower right corner, at 30 % of the picture's width.
A PiP video with sound brings it along: the sound goes onto the overlay track's own audio track, right under it (Overlay 1 audio), linked to the PiP so it stays in step. Move the PiP to another overlay track and its sound moves to that track's audio track. Select the PiP to set its sound's level, noise reduction and fades in the Audio tab (see Audio and noise reduction). If you've removed the sound, right-click the PiP and choose Put its sound on an audio track to get it back.
Selecting a picture in picture
Click the PiP clip on the timeline, or click the PiP itself in the viewport. The Picture in picture tab then shows its settings. With no PiP selected, the tab is greyed out. A title's settings are on a tab of their own, the Overlay tab (Titles).
Position, size and opacity
- Move it: drag the PiP in the viewport. The pointer turns into a four-way arrow over a PiP. Or type Position X and Position Y: where the PiP's centre is, as a percentage of the picture's width and height (0 % is the left or top edge, 100 % the right or bottom edge). A PiP can hang partly off the edge.
- Size: the PiP's width, as a percentage of the picture's width. Its height follows the shape of the video: a phone video filmed upright gives a tall PiP.
- Opacity: 100 % is solid; lower values let the 360° video show through.
The position, size and opacity are stored as shares of the picture, so they stay right if you change the project's resolution or aspect ratio later (though the PiP may then cover a different part of the picture).
Moving a picture in picture during a clip
Without keyframes, a PiP keeps one position, size and opacity for the whole clip. With keyframes it can move, grow, shrink or fade during the clip: you set the look at a few moments, and the PiP moves from one to the next. This works like the reframe keyframes of the 360° view (Reframing).
- Select the PiP, and move the playhead to where a change should start.
- Click Set key (or press
K). The PiP's current position, size and opacity are stored at the playhead. - Move the playhead to where the change should end, and move, resize or fade the PiP. Once a PiP has keyframes, every change you make, in the tab or by dragging it in the viewport, sets a keyframe at the playhead.
- Play to check, and add keyframes in between to shape the movement.
Keyframes in the tab says how many the PiP has.
- Delete (or
Shift+K) removes the keyframe at the playhead (within 0.15 seconds of it). - Clear removes all keyframes. The PiP stays as it looks at the playhead.
- Easing sets how the PiP moves from the keyframe at the playhead (or the last one before it) to the next: Linear (an even pace), Fast to slow (slows down into the next keyframe) or Slow to fast (starts slowly and speeds up). It works like the easing of reframe keyframes (Easing), including the gentle start and stop of every move, and is greyed out where the playhead isn't between two keyframes. New keyframes are linear.
With keyframes, the playhead has to be inside the PiP clip to change the PiP: a change needs a moment to store its keyframe at.
Trimming or splitting a PiP clip deletes the keyframes it leaves outside the clip, as for reframe keyframes (Keyframes). If none are left, the PiP keeps the look it had at the clip's new start.
While a PiP clip is selected, K and Shift+K work on its keyframes,
not the video clip's reframe keyframes. Click the video track (or press
Esc) to get back to those.
Deleteon the keyboard removes the selected PiP clip, not a keyframe. UseShift+Kor the Delete button in the tab for keyframes. Edit ▸ Undo (Ctrl+Z) brings back anything removed by mistake.
The frame
These settings are the same for the whole clip:
| Setting | What it does |
|---|---|
| Corners | Rounds the corners. 0 % gives sharp corners; 50 % makes the short sides fully round. |
| Border | A border around the PiP, as a share of the picture's height. 0 % is no border; 0.5 % is about 5 pixels in a 1080p video. |
| Border colour | Click to choose the border's colour. |
| Fade in / Fade out | Fades the PiP in at the start of the clip, or out at its end, over this many seconds. |
| Start | Where the clip starts on the timeline, in seconds. |
| Duration | How long the clip shows, in seconds. Its start stays put and its end moves, like dragging its end on the timeline; a PiP video can't run past the end of its file. |
Sliding and popping in and out
The Animation section, under the PiP's other settings, sets how the PiP comes on at its start and goes off at its end:
| Setting | What it does |
|---|---|
| In | Slide in from the left, right, top or bottom: the PiP starts just outside that edge of the picture and slides to its place, slowing down as it arrives. Pop up: it grows from nothing, a little past its full size, and settles. None: it is simply there. |
| Length | How long coming on takes, in seconds. |
| Out | The same backwards: Slide out to the left, right, top or bottom, speeding up as it leaves, or Shrink away. |
| Length | How long going off takes. |
The animation is tied to the clip's start and end, so it stays right when you trim the clip or move it. It adds to everything else: a PiP with keyframes slides in to where its keys put it, and a fade in fades it in as it slides. If the clip is shorter than both lengths together, each takes its share of the clip's time. Splitting a PiP keeps its In on the first part and its Out on the second. Titles and gauges have the same section, which for a title can also type the text on and off (Titles).
Several overlays
You can show several overlays (PiPs, titles and gauges) at once, on separate overlay tracks, with no fixed limit. Each overlay keeps its picture in graphics memory while it's on screen; if the graphics card runs out, the overlays it has no room for are left out of the viewport (the export still has them), and the app's log says so. Each overlay track is a layer, numbered in the small box in its track header: layer 1 is in front, and each number after it is drawn behind the one before. Where overlays overlap, the one on the lower-numbered layer covers the other. The first overlay track on the timeline is always layer 1. Hover over the number to see where the track sits.
To change the order, select a PiP and click Bring forward or Send backward next to Layer in the Picture in picture tab (or a title's Overlay tab). The tab also shows the layer, for example 1 of 2 (front); hover over it to see which tracks are in front and behind. You can also right-click an overlay track and choose Bring forward / Send backward, or drag its track header up or down. The whole track moves, with its audio track, so every overlay on it changes layer.
To hide all overlays on a track for a while, click the H box in its track header.
PiPs appear in playback, screenshots and the export exactly as in the viewport. The colour settings of the 360° clip don't change them, and stabilization doesn't move them.