The manual of orbis-reframe 0.10.1, the newest release. What has changed since is in the development version on GitHub.
The timeline
The timeline is your edit: which clips play, in which order, and what plays alongside them. This page covers moving around in it, arranging and cutting the 360° clips, and adding music, other sound and picture-in-picture overlays. For the names of the window's parts, see The main window.

- The ruler, with the time in minutes and seconds.
- The playhead: the frame shown in the viewport.
- The video track, with your clips. The white diamonds along the bottom edge are reframe keyframes; a hollow diamond (◇) before a clip's name means it has none, and exports looking straight ahead. A ✦ before a clip's name means it has an effect on. Yellow dots along the top edge are highlight marks: set while recording, or by you.
- The Camera mic track: the clips' sound, linked to them (the chain icon).
- An audio track, with a music file. The waveform shows how loud it is, and the slanted lines at its ends are fades.
- An overlay track, with a picture-in-picture clip.
- The track headers: each track's name and its M (mute) or H (hide) box. An overlay track also shows its layer number (1 is in front).
The video track sets the length of your video: the export runs from the start of the first clip to the end of the last. Audio and overlay clips that reach past that end are cut off.
Moving around
Only the ruler (and the player bar's progress bar under the viewport) moves the playhead. Click on it to jump to a frame, or drag along it to scrub through the video. Clicking a clip selects it but leaves the playhead where it is.
| Key | Moves the playhead |
|---|---|
Space |
Play / pause. |
← / → |
One frame back / forward (pauses playback). |
Shift+← / Shift+→ |
One second back / forward. |
↑ / ↓ |
To the previous / next cut or clip edge. |
Ctrl+↑ / Ctrl+↓ |
To the previous / next highlight mark. |
M / Shift+M |
Add / delete a highlight mark at the playhead. |
Home / End |
To the start / end of the timeline. |
Zooming. Hold Ctrl and turn the mouse wheel over the timeline to zoom
in or out around the pointer. Ctrl++ and Ctrl+- zoom around the
playhead, and Ctrl+0 fits the whole edit in the window again. The same
commands are the zoom buttons at the right end of the edit toolbar, and in
the menu you get by right-clicking an empty part of a track.
While zoomed in, turn the mouse wheel (without Ctrl) or drag the scroll
bar under the tracks to move along the timeline. When the playhead runs
off the edge, for example during playback, the view follows it. While you
drag a clip or a trim handle past the left or right edge, the view scrolls
along until you move back.
More tracks than fit. Turn the mouse wheel over the track names, or
hold Shift and turn it anywhere on the timeline, to scroll the tracks up
and down; the scroll bar at the right edge does the same. While you drag a
clip to another track, a track name to reorder, or files from the media
pool onto a track, hold the pointer near the top or bottom of the tracks
and they scroll until the one you want comes into view. To make the
timeline taller, drag the line between it and the viewport up.
The video track
The video track holds your clips, one after another, with a hard cut
from each clip to the next: 360° .insv clips, and flat videos from a
phone or an action camera if you like (below). There are never gaps between them: when you
shorten or remove a clip, the clips after it move up. A cut can go over from
one clip to the next instead, with a crossfade or a dip to black: see
Transitions. A transition shows as a box over its cut.
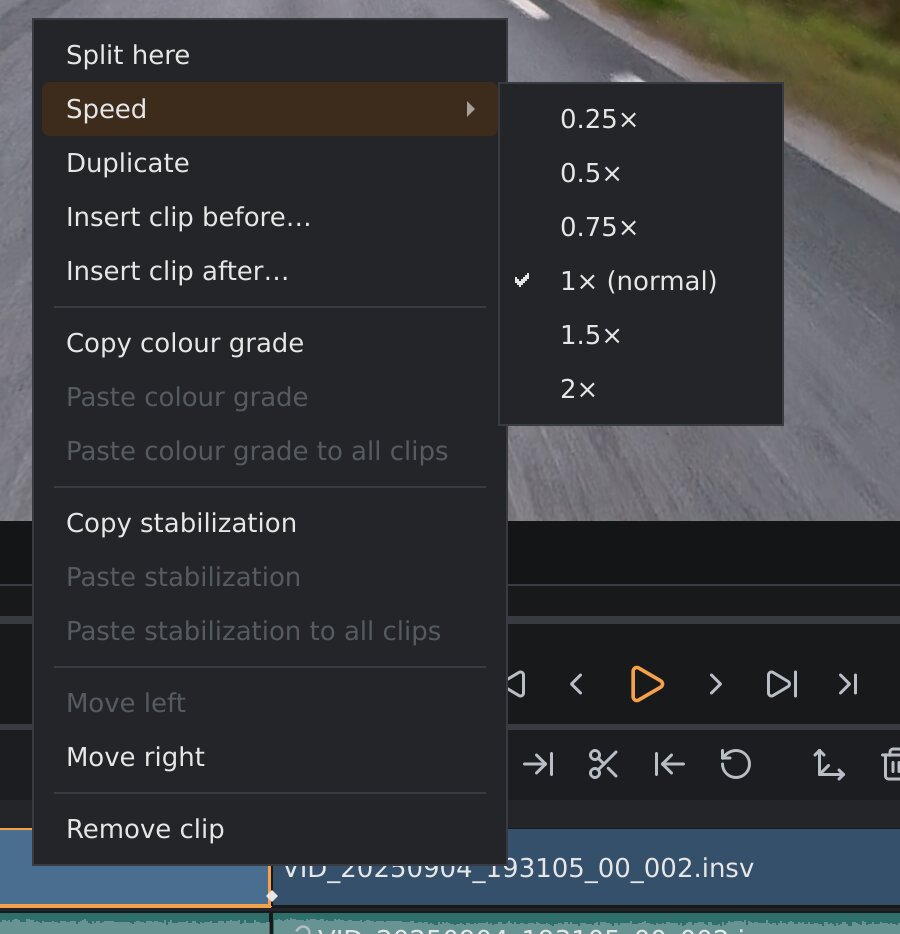
Right-click a clip for its menu: split it, change its speed, duplicate it, insert another clip before or after it, copy or paste its colour grade (Colour) or its stabilization (Stabilization), move it, or remove it.
Adding clips
- Media ▸ Add clip to timeline… (
Ctrl+Shift+A) adds a clip at the end: an.insvfile or a flat video. - Right-click a clip and choose Insert clip before… or Insert clip after… to put the new clip next to it.
- Right-click an empty part of the video track (or of an empty timeline) and choose Add clip here…. The clip goes in at the nearest cut.
- Drag clips from the Media tab on the left (The main window) onto the timeline; double-clicking one there adds it at the end.
- Drag
.insvfiles from your file manager onto the timeline panel (not the viewport). They go in at the cut nearest to where you drop them, in the order the file manager gives them; on an empty timeline the first one starts the video track. Drop the.insvmaster, not the.lrvproxy. - A recording longer than the camera's file limit (29 min 59 s on the X5)
is split by the camera into several
.insvfiles with the same date and time in their names. It goes in as one clip whichever of its files you add or drop, as long as they are in the same folder under the names the camera gave them; dropping several of them adds it once. A copy that Insta360's software wrote after a trim (…_019-trim.insv,…_020-trim.insv) goes in the same way, with its other-trimfiles, even in the same folder as the camera's own files. It plays and exports straight through from one file into the next, picture, stabilization and sound alike; the sound crossfades over the first 20 ms of the next file, so the cut doesn't click. If one of its files is missing, the rest still plays and the part that's gone shows red (Where the clips are). Media information lists its files. - Flat videos dropped on the video track (or on an empty timeline) go in the same way. Dropped anywhere else, they become pictures in picture (below).
You can add the same .insv file more than once, for example to use two
different parts of a long recording.
Flat videos on the video track
A flat video (.mp4, .mov, .mkv, .m4v, .webm or .avi, for example
from a phone or an action camera) can be a clip on the video track like an
.insv: a whole project of phone videos, or a ride that cuts from the 360°
camera to a phone and back. Its sound goes on the Camera mic track,
linked to it.
A flat video is shown as it is. If its shape differs from your video's (a phone video filmed upright in a 16:9 project), it's shown whole with black bars at the sides. To fill the frame instead, cropping the edges that don't fit, select the clip and set Fit in the Reframe section to Fill the frame, edges cropped (Reframing).
Trimming, splitting, speed, colour, effects, overlays over it, its sound and the export work as for any clip. The parts that need a 360° clip don't apply, and their sections say so: reframing and Track subject, stabilization, the number-plate blur, and stitching.
Selecting a clip
Click a clip to select it. The settings sidebar's sections (stabilization,
colour, audio and so on) now change this clip, even when the playhead is
somewhere else. Press Esc to clear the selection. The sections then follow
the clip under the playhead again. The clip they're changing always has an
orange outline.
Reordering
Drag a clip to another place on the video track. You can also right-click it and choose Move left or Move right.
Trimming
Trimming cuts frames off the start or end of a clip. Nothing is deleted
from the file: you can always get the frames back. The clip's keyframes in
the part you cut off are deleted, though, and don't come back when you
trim the clip longer again (Ctrl+Z does bring them back).
- Drag the left or right edge of a clip.
- Or move the playhead to the frame you want, and press
[to make the clip start there or]to make it end there. The two buttons in the edit toolbar do the same. - The Restore button in the edit toolbar (
R) gives the clip its full length back.
[, ] and Restore work on the selected clip, or on the clip under the
playhead if none is selected. With a selected clip, the playhead has to be
inside that clip.
Splitting
Splitting cuts a clip in two at the playhead, so you can remove the middle of a recording, or give each part its own settings.
- Move the playhead to the frame where the cut should be and press
S, or click the scissors on the edit toolbar. - Or right-click the clip where you want the cut and choose Split here.
Both halves keep everything the clip had: its stabilization, colour and audio settings, and its highlight marks. Each half keeps the keyframes inside it; a keyframe right on the cut goes to both.
Duplicating
Right-click a clip and choose Duplicate. A copy goes right after it, with everything the clip has: trims, speed, reframe keyframes, highlight marks, stabilization, stitching, colour, privacy blur, and its sound on the audio tracks. The clips after it move up to make room. The copy is selected, so the settings sidebar changes the copy, not the original. Use it to show the same moment twice, say once from the front and once from behind, with different reframe keyframes.
Speed: slow motion and fast forward
Right-click a clip and choose a speed under Speed: 0.25×, 0.5×, 0.75×, 1× (normal), 1.5× or 2×. The clip gets longer or shorter on the timeline to match. Its sound is sped up or slowed down without changing its pitch.
Slow motion looks smoothest with footage shot at a high frame rate: a clip recorded at 120 fps, played at 0.25×, shows every frame it recorded in a 30 fps export.
Highlight marks
Highlight marks are yellow dots on a clip's top edge (dark gold in the Light theme) that help you find the moments worth keeping in a long recording. Some come from the camera: while recording, you can mark a moment, and orbis-reframe reads those marks from the file. You can add your own too, say while watching a ride through before you edit it.
M(or Edit ▸ Add mark) adds a mark at the playhead, on the clip under it. It works on flat videos too.Shift+M(or Edit ▸ Delete mark) deletes the mark at the playhead. You can also right-click a dot and choose Delete mark.- A mark set while recording can't be deleted, since it's in the file, but
you can hide it:
Shift+Mon it, or right-click its dot and choose Hide mark. To get the hidden ones back, right-click the clip and choose Show hidden marks, which says how many there are. - Point at a dot to see whether it's yours or the camera's. Click it to move the playhead there.
Ctrl+↓andCtrl+↑jump to the next and previous mark on the timeline, across clips. Hidden marks are skipped.- The marks belong to the footage: trimming, splitting and changing the speed keep each one on the moment it marked, and a mark in a part you've trimmed off is hidden until you trim the clip longer again. Both halves of a split and a duplicated clip keep the marks, and a mark hidden on one clip still shows on the others.
- Your marks and the ones you've hidden are saved in the project, and adding, deleting or hiding a mark can be undone.
- Media information says how many marks the file has.
- You can mark a file before it goes on the timeline, too, while you
preview it in the Media tab: its marks show on the player bar's
progress bar, and
M,Shift+Mand the dots work there the same way. A clip you then make from the file starts with those marks; from then on the clip's marks and the file's are separate. See Previewing a file.
Only clips from cameras whose marks orbis-reframe knows how to read show the camera's marks; so far that's the X5.
Removing
Select the clip and press Delete (or Backspace), or right-click it and
choose Remove clip. Its linked audio (see below) is removed with it.
The camera's sound
The video track holds only the picture. The sound the camera recorded goes onto an audio track right under it, Camera mic, as one audio clip per video clip, linked to it (see below). A clip recorded with an external microphone such as the Insta360 Mic Air has a second recording, which goes onto an External mic track under that. Click the M box in a track's header to mute that microphone for all clips, for example when your video should only have music. The Audio tab sets the volume and reduces noise and wind for each clip: see Audio and noise reduction.
Audio and overlay tracks
Besides the video track, you can add any number of other tracks:
- Audio tracks, under the video track and its Camera mic and
External mic tracks: music, sound effects, a voice-over, or sound from
an external recorder. Files:
.mp3,.wav,.flac,.aac,.m4a,.oggand.opus. A new project has none. - Overlay tracks, under the audio tracks: ordinary flat videos shown as
a picture in picture (PiP) over the 360° video, for example from a phone or an
action camera. Files:
.mp4,.mov,.mkv,.m4v,.webmand.avi. A PiP's sound goes on a track of its own right under its overlay track, called after it (Overlay 1 audio); that track comes when the first PiP with sound is put on the overlay track, and goes when its last clip is removed. How to place and size PiPs is in Picture in picture. Overlay tracks also hold titles, text over the video (Titles).
So from top to bottom the timeline has three groups of tracks, with a little space between them: the video track and its sound, the audio tracks, and the overlay tracks with their sound. The names of the tracks that hold a video's own sound (Camera mic, External mic, a PiP's audio track) are indented under their video.
To make room, a video's own sound tracks can be folded away under it: click the Video track's header, or the triangle in front of an overlay track's name (or right-click the track and choose Fold sound tracks away). The triangle then points right. Click it again (or choose Show sound tracks) to bring them back. Folded tracks are only hidden: they still play and are exported. Whether the video track's sound is folded is remembered for all your projects; an overlay track's opens again the next time you start orbis-reframe.
Unlike the video track, these tracks can have gaps: each clip sits at its own time.
You need at least one clip on the video track before you can add audio or overlays.
Adding audio and overlays
There are four ways:
- Media ▸ Add audio file… (
Ctrl+Shift+M) or Media ▸ Add picture in picture… (Ctrl+Shift+V). The file goes in at the playhead. - Drag files from the Media tab onto the timeline, the same way as from a file manager (below), or double-click one there to put it in at the playhead. (On an empty timeline, a flat video double-clicked there becomes the first clip on the video track instead.)
- Right-click on the timeline where the clip should start and choose Add audio file here… or Add PiP here….
- Drag audio files or flat videos from your file manager onto the timeline
panel (not the viewport). They go in where you drop them: on the track you
drop them on, or, if you drop them somewhere else on the timeline, on the
first track with room for them. Audio files go on the audio tracks only,
not on Camera mic, External mic or a PiP's audio track: dropped
there, they go on the first audio track with room. Dropped together with
.insvclips, they start where the clips go in. Without a clip on the video track, only clips can be dropped:.insvfiles, and flat videos, which then start the video track.
Titles come from the Overlays tab instead; see Titles.
If there's no track of the right kind with room, orbis-reframe makes a new one. To make an empty track yourself, choose Media ▸ Add audio track or Media ▸ Add overlay track, or right-click the timeline and choose one of them.
Editing clips on these tracks
| To | Do |
|---|---|
| Select a clip | Click it. |
| Move it in time | Drag it left or right. It snaps to the playhead, the cuts on the video track and the edges of other clips. |
| Move it to another track | Drag it up or down onto another track of the same kind. Camera mic, External mic and a PiP's audio track only take that video's own sound (see Linked audio). |
| Trim it | Drag its left or right edge, or select it and use [ and ] as on the video track. |
| Split it | Select it and press S, or right-click it and choose Split here. |
| Remove it | Select it and press Delete, or right-click it and choose Remove audio clip / Remove overlay clip. |
| Change its volume or fade it in and out | Select it and use the settings sidebar's Audio tab. |
| Change an overlay's size, position or look | Select it and use the settings sidebar's Picture in picture tab (a title: the Overlay tab). |
S, [, ] and Delete act on the selected audio or overlay clip if
there is one, and on the video track otherwise.
Managing tracks
| To | Do |
|---|---|
| Mute an audio track | Click the M box in its header. Click it again to hear it. |
| Hide an overlay track | Click the H box in its header. |
| Rename a track | Double-click its name, type the new name and press Enter (Esc cancels). Or right-click it and choose Rename track…. |
| Change the order of tracks | Drag a track header up or down, or right-click the track and choose Move track up / Move track down. A track stays in its group: Camera mic and External mic under the video track, audio tracks among the audio tracks, overlay tracks among the overlay tracks. An overlay track takes its audio track along; that audio track can't be moved on its own. For an overlay track the menu says Bring forward / Send backward: its place is its layer, the number in its header (1 is drawn in front, see Several overlays). |
| Remove a track and everything on it | Right-click the track and choose Remove track. Removing an overlay track removes its audio track too. |
Linked audio
An audio clip can be linked to a clip on the video track or on an overlay track. A linked clip keeps in step with that clip: when you move, trim, split or speed up the video, its linked audio does the same, and when you remove the video clip, the linked audio goes with it. Linked clips show a chain icon before their name. A linked clip can't be moved, neither to another time nor to another track.
You get linked audio in two ways:
- The camera's sound. Every
.insvclip's sound is linked audio on the Camera mic track, and on the External mic track when an external microphone was connected (see above). - A PiP's sound. A PiP video with sound gets its sound as linked audio when you add it (removed, it comes back with Put its sound on an audio track in the PiP's right-click menu).
To link or unlink an audio clip yourself, right-click it and choose Link to video clip or Unlink from video clip. Link is only offered when a video clip shows the same recording, for example after you've unlinked the clip. Unlinking never moves the clip. Linking keeps it at its time, and if it isn't on its video's own sound track any more, puts it back there. To shift a clip's sound against its picture, unlink it, move it, and link it again.
The tracks that hold a video's own sound -- Camera mic, External mic and a PiP's audio track -- take only that sound, linked or unlinked: music and other audio clips can't be dragged onto them. An unlinked clip can stay where it is, or be dragged onto one of the audio tracks to use it like any other audio clip, and back. When you remove a video clip, only its linked audio goes with it; clips you unlinked stay.
Audio and overlay clips that aren't linked stay at their time when you edit the video track. If you shorten or remove a video clip, check that your music and overlays still line up.