The manual of orbis-reframe 0.10.1, the newest release. What has changed since is in the development version on GitHub.
Reframing
A 360° clip records everything around the camera. Reframing chooses what your flat video shows: where the virtual camera looks at each moment, and how wide its view is. You do this with reframe keyframes: you set the view at a few moments, and orbis-reframe moves the camera smoothly from one to the next. Track subject can also set the keyframes for you, by following a person or vehicle. With split screen, one clip shows two or four views at once.
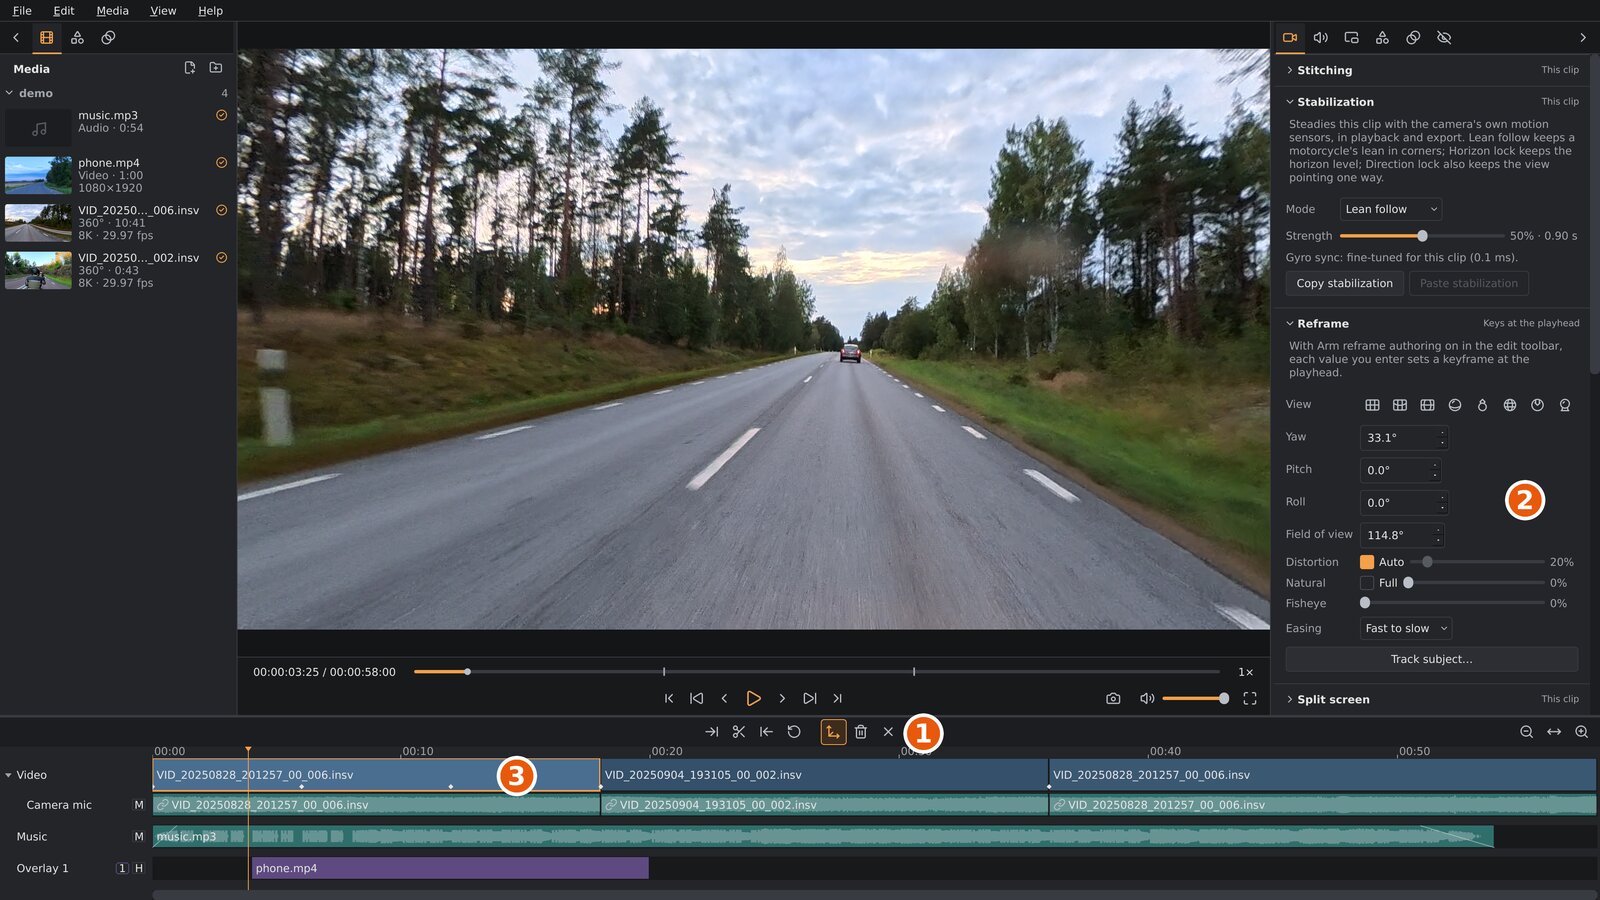
- The edit toolbar, with Arm reframe authoring on: the button outlined in orange. While it's on, every look-around in the viewport sets a keyframe.
- The Reframe section: the View presets, the view at the playhead as numbers, and Track subject….
- The clip's keyframes: the white diamonds along the bottom of the clip.
The view
The view has seven settings. You can see and type them in the Reframe section (settings sidebar, Video tab):
| Setting | What it is | Range |
|---|---|---|
| Yaw | Left / right: the compass direction the camera looks in. 0° is straight ahead of the camera. | −180° to 180° |
| Pitch | Up / down. 0° is level, 90° straight up. | −89° to 89° |
| Roll | Tilts the picture, like tilting your head. Usually 0°. | −180° to 180° |
| Field of view | How much the view takes in, from one corner of the picture to the opposite one. Small values zoom in, large values give a wide view. | 20° to 330°, depending on Distortion |
| Distortion | How a wide view is drawn: Auto, or a fixed amount from 0 % to 100 %, and on to 200 % for a globe (see Wide views and tiny planets and Globes). | Auto, 0 % to 200 % |
| Natural | Bends a distorted view only sideways, so upright lines stay upright: Full, or an amount (see Natural). | Off, Full, or 0 % to 100 % |
| Fisheye | Turns the view into a fisheye lens's picture at 100 %, and on to a mirror ball at 200 % (see Fisheyes and mirror balls). | 0 % to 200 % |
Above the fields, the View buttons set a whole view shape at once (see View presets). In the viewport, dragging changes yaw and pitch, and the mouse wheel changes the field of view. Roll, distortion, Natural and Fisheye can only be set in the section. The section is greyed out while there's no clip to reframe: none selected and none under the playhead.
The field of view is measured corner to corner, so the same value takes in as much in a landscape picture as in a portrait one; only the shape of the picture differs. The project's aspect ratio (File ▸ Project settings…) sets that shape. Changing the aspect ratio later keeps your keyframes; the corners stay where they were, the edges of the picture move.
View presets
The eight buttons in the View row of the Reframe section set the shape of the view in one click; hold the pointer over one for its name and what it sets. They keep the yaw, so the camera still looks the same way, and set the roll to 0°:
| Button | Pitch | Field of view | Distortion | Natural | Fisheye |
|---|---|---|---|---|---|
| Normal: a straight grid | 0° | 115° | Auto | Off | 0 % |
| Natural: the grid with a bent horizon | 0° | 170° | 100 % | Full | 0 % |
| Fisheye: the grid bulging out | 0° | 180° | 100 % | Off | 100 % |
| Mirror ball: a shiny ball | 0° | 270° | 100 % | Off | 200 % |
| Tiny planet: a house on a small world | −89° | 300° | 100 % | Off | 0 % |
| Globe: a ball | −89° | 200° | 170 % | Off | 0 % |
| Tunnel: a house hanging into a ring | 89° | 300° | 100 % | Off | 0 % |
| Crystal ball: a ball on a stand | 89° | 200° | 170 % | Off | 0 % |
A button does what typing those values into the fields would: with Arm reframe authoring on it sets a keyframe at the playhead, and Edit ▸ Undo takes the whole click back. It isn't a mode: the fields and sliders still show the view, and you can go on from the preset to anything in between. Two keyframes with different presets blend like any other two, so a key on Normal followed by one on Tiny planet zooms out into the planet, and one on Globe after it draws the planet together into a ball. The sections below say what each shape does.
Wide views and tiny planets

- 140° at 0 %: straight lines stay straight, but the rider in the middle is small and everything toward the edges is stretched.
- The same 140° at Auto: the middle is larger and the edges stretch much less; lines away from the middle bend a little.
- A tiny planet: pitch −89° (straight down), field of view 300°.
A normal camera view keeps straight lines straight. That works up to a field of view of about 90°; wider, the edges of the picture stretch more and more, and the middle shrinks. Distortion draws a wide view the way a fisheye lens would instead: the edges keep their shapes, and lines away from the middle bend.
With Auto ticked (the default), the distortion follows the field of view: it uses the least amount that keeps shapes in the corners from stretching more than half again their size, so lines stay as straight as that allows. That is none up to about 95°, about 20 % at the default 115°, 45 % at 145° and 75 % at 200°. From 270° on, where the view is a tiny planet, it rises to full at 300°. The slider shows the amount Auto uses. Untick Auto to set the amount yourself with the slider: 0 % keeps every line straight, 100 % keeps every shape. The widest field of view depends on the amount: 145° at 0 %, 330° at 100 % or with Auto. Lowering the amount narrows a view that is wider than it allows.
For a tiny planet, click Tiny planet under View, or look straight down (pitch −89°) and widen the field of view to 250° or more: the ground curls into a small globe with the sky around it. Looking straight up instead turns the sky into a tunnel, with the world round it (Tunnel under View). A keyframe move from a normal view to a tiny planet zooms out smoothly, and with Auto on both keyframes the picture bends more and more as it widens.
Globes
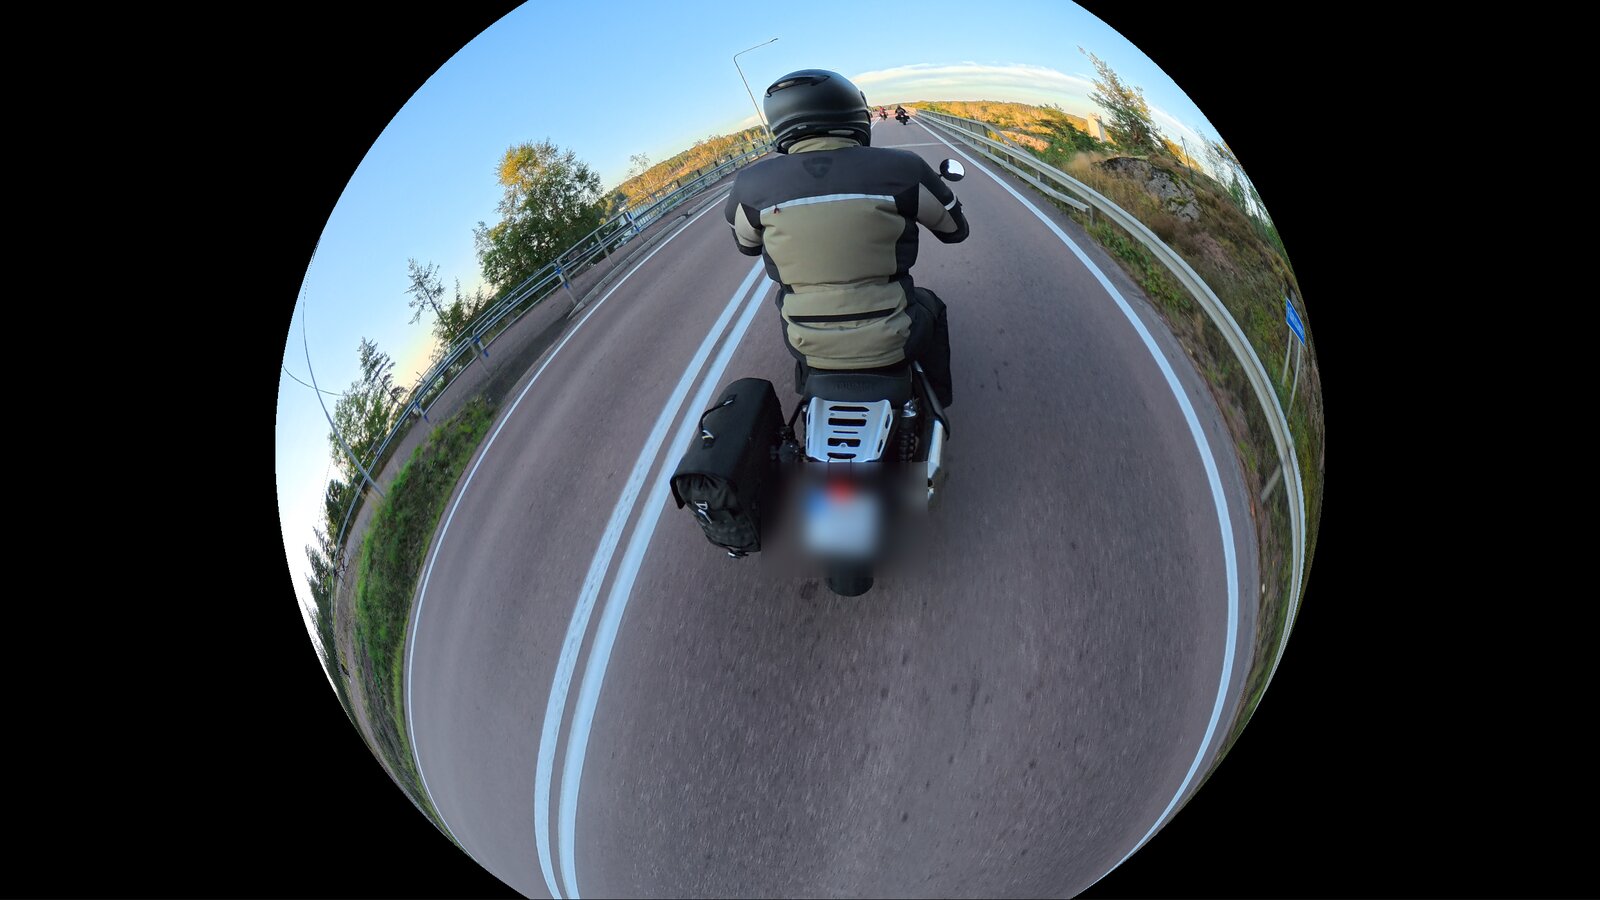
Past 100 %, Distortion shows the world as a globe: a ball you look at from outside, on black. At 100 % it is a tiny planet that fills the picture; as the amount rises, the world draws together into a disc and the picture around it turns black, as if you stepped further and further back. At 200 % you see one half of the world in the disc, the half the view looks at. 100 % is the middle of the slider.
Globe under View sets one up. Look straight down for a planet-like globe, or straight up for the sky in a ball, the look of a crystal ball photo (Crystal ball under View). On a globe, Field of view still sets how big the picture is: the disc is as large as the tiny planet at that angle would be at 100 %, so wider makes the globe smaller. Auto never goes past 100 %, so zooming out on Auto gives a tiny planet, not a globe; untick it and drag the slider past the middle. Between two keyframes the amount moves smoothly, so a tiny planet can turn into a globe and back.
Natural
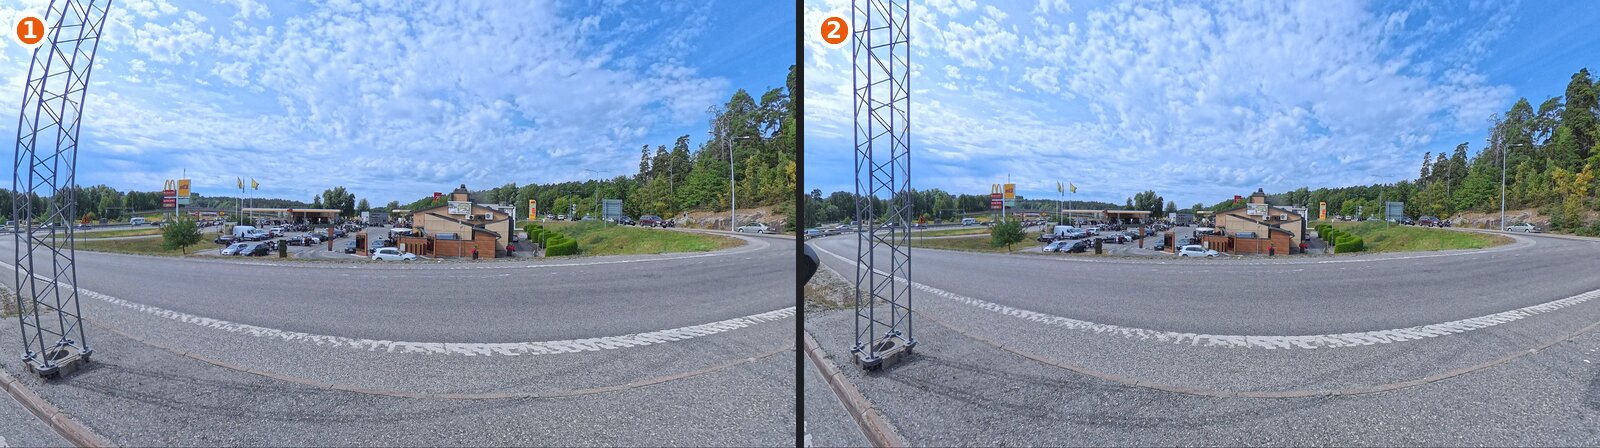
- 157° at 100 % distortion: the mast on the left bows outward, and so do the lamp posts on the right.
- The same view with Natural on Full: the mast and the lamp posts stand straight; the road still curves.
Natural changes how Distortion bends the picture. A distorted view bends every line that doesn't run through the middle, upright ones too: lamp posts and door frames lean outward toward the sides. Natural takes the bend out of the up-and-down direction and leaves it in the sideways one, so upright lines stay upright and lines through the middle stay straight, while the width keeps the look the distortion gives it. Lines across the picture, like a horizon above or below the middle, still curve. That suits wide shots of streets, rooms and buildings.
Tick Full to take the bend out of the up-and-down direction altogether (100 %); untick it to turn Natural off (0 %, the default). The slider sets an amount in between: it unticks Full, and dragging it back to 100 % ticks it again. With a lot of Natural the top and bottom of a very wide view stretch, and the widest field of view is a little less; an amount below 100 % trades some of the lean for less stretch, which can suit a tall picture. Full Natural at 100 % distortion is the view photographers call Panini.
Natural works on the distortion, so at 0 % distortion it does nothing: the picture there has no bend to take out. With Auto, it acts on the amount Auto uses, which is small at the default field of view. To see it clearly, click Natural under View (or untick Auto, set the distortion to 100 % and the field of view to 170° or more), and look level at something upright near the sides. Upright lines come out upright when the view is level with the world: if the horizon is tilted, they straighten along the tilt. Between two keyframes the amount moves smoothly, like the distortion. Natural works on a globe too, which draws it as a barrel.
Fisheyes and mirror balls
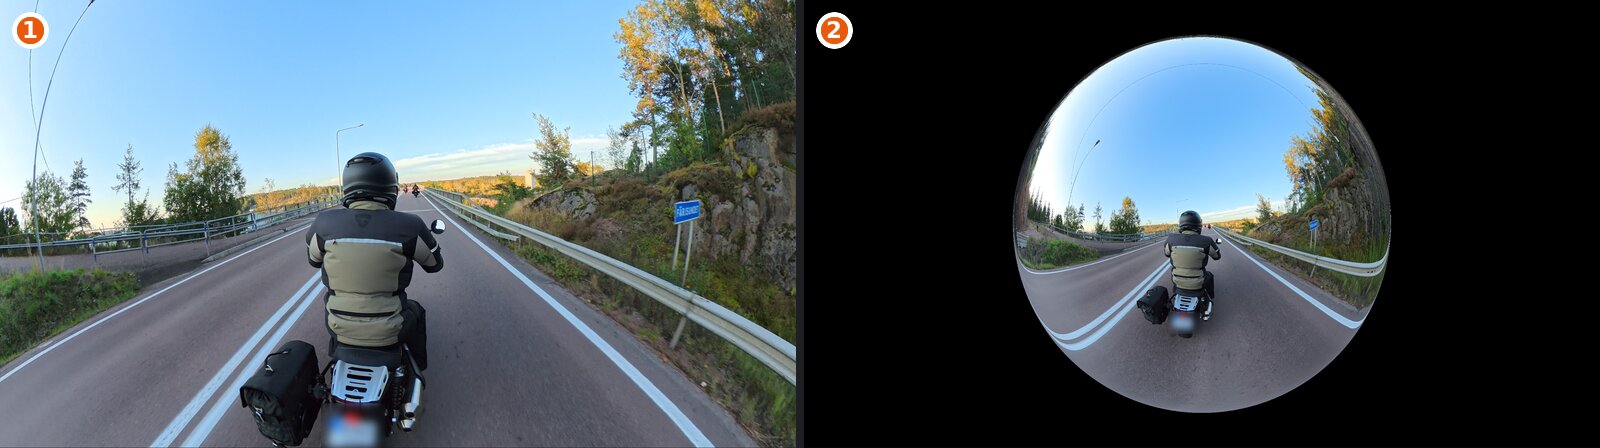
- Fisheye at 100 %, 180°, looking a little down: the guard rail and the lamp post bend round the middle, and the picture reaches far to the sides without stretching.
- Fisheye at 200 %, 270°: a mirror ball, the whole world in a disc.
Fisheye draws the view the way a fisheye lens does. At 100 % it is a true fisheye: how far a thing is from the middle of the picture is how far it is from where the view looks, so the picture can take in the whole world, with what's behind you round its rim and black beyond. Past 100 % the picture draws together into a mirror ball, the whole world in a disc on black, at 200 %. Fisheye and Mirror ball under View set them up. The middle of the ball is where the view looks; a real mirror ball shows the camera in its middle, which you get by turning the yaw 180°.
Between 0 % and 100 % the picture moves from what Distortion and Natural give to the fisheye. From 100 % up they no longer change its shape, only its size: Field of view sets how big the picture is as it would without Fisheye, so at the same angle a fisheye takes in more than a plain view. For the whole mirror ball in a 16:9 picture, set the field of view to about 260° or more at 100 % distortion.
Between two keyframes the amount moves smoothly, so a normal view can bend into a fisheye and on into a mirror ball. A tiny planet with Fisheye on draws together into a disc too, and quickly over the first few per cent. Fisheye works on a globe as well: the black round it opens out as the amount rises.
Projects from earlier versions keep their views: each keyframe takes the corner-to-corner angle that frames what it framed before, with distortion on Auto. Views wider than about 95° corner to corner now look less stretched at the edges; that is most of them, since the old default, 75° from top to bottom, is 115° corner to corner in a 16:9 picture. To get the old look back, untick Auto and set 0 %.
Keyframes
A keyframe stores the view (yaw, pitch, roll, field of view, distortion, Natural and Fisheye) at one moment of a clip. Between two keyframes the camera turns and zooms from one view to the other, the short way round, at the pace the first keyframe's Easing sets (see Easing). Distortion changes along with the field of view: between two keyframes on Auto it follows the field of view as it zooms; otherwise it moves from one keyframe's amount to the other's. Before a clip's first keyframe the view stays as at that keyframe, and after the last keyframe it stays as at the last one.
Each clip has its own keyframes, stored with the clip. They move with the
clip when you reorder or trim it, and each half of a split clip keeps the
keyframes inside it. A keyframe that a trim leaves exactly on the clip's
end shows its diamond on the clip's last frame, where clicking it or
Shift+↓ takes the playhead and you can change or delete it like any
other. A trim deletes the keyframes it leaves outside the clip, so the
view in what's left is set by the keyframes you can see. Where the view
was turning toward a deleted keyframe, it now holds at the nearest one
that's left: set a keyframe at the clip's start or end to keep it turning.
Trimming the clip longer again doesn't bring the deleted keyframes back;
Ctrl+Z does.
A project saved with an older version can still have keyframes outside a clip: they have no diamond, but they steer the view up to the clip's edge. The next trim of that clip deletes them.
A clip without keyframes is exported looking straight ahead (yaw 0°, pitch 0°, field of view 115°, distortion Auto), whatever you looked at in the viewport. The viewport starts there too when playback or the playhead enters such a clip, so it doesn't keep the previous clip's view. Give every clip at least one keyframe. A clip without any shows a hollow diamond (◇) before its name on the timeline, the Reframe section warns while the playhead is in it, and the export dialog lists it.
Setting keyframes
The simplest way, for a clip that should look in one direction all the time:
- Move the playhead into the clip.
- Drag in the viewport until the view is right, and zoom with the mouse wheel.
- Press
K. This sets a keyframe with the current view at the playhead.
To make the camera move during a clip, set more keyframes:
- Click Arm reframe authoring in the edit toolbar, or press
A. - Move the playhead to where a move should start, and drag the view into place. When you let go of the mouse button, a keyframe is set at the playhead. Turning the mouse wheel sets one too.
- Move the playhead to where the move should end, and drag the view into its new place. A second keyframe is set.
- Play the clip to check the move. Add keyframes in between to shape it.
- Click Arm reframe authoring again (or press
A) to turn it off, so that looking around no longer changes your keyframes.
Pause before you set keyframes: they go in at the frame the playhead is on. If there's already a keyframe at that frame, its view is replaced instead of a second keyframe being added.
You can also type exact values into the Reframe section. With reframe authoring armed, each value you enter sets a keyframe at the playhead, the same as a drag. Without it, the values only change what the viewport shows.
Looking around without changing anything
Without reframe authoring armed, you can drag in the viewport freely to look around, for example to find your next subject. Your keyframes don't change. Once the clip plays or you move the playhead, the view goes back to following the keyframes.
Changing and deleting keyframes
- Go to a keyframe:
Shift+↓andShift+↑move the playhead to the next and previous keyframe, across all clips. Or click a keyframe's diamond on the clip -- it highlights under the pointer -- to move the playhead to it directly. - Change a keyframe: move the playhead onto it, and set the view again
(with reframe authoring armed, or by pressing
K). The keyframe's view is replaced. - Delete a keyframe: move the playhead onto it, and press
Shift+Kor click Delete keyframe in the edit toolbar. The playhead doesn't have to be on the exact frame: a keyframe within 0.15 seconds is deleted.Deletedoes the same when no clip is selected. - Delete all keyframes of a clip: move the playhead into the clip, and
click Delete all keyframes in the edit toolbar (
Ctrl+Shift+K).
Edit ▸ Undo (Ctrl+Z) undoes keyframe changes like any other edit.
Easing
Easing in the Reframe section sets how the camera moves from one keyframe to the next:
| Easing | The move |
|---|---|
| Linear | At an even pace. |
| Fast to slow | Starts fast and slows down, coming to rest at the next keyframe. Good for settling on a subject. |
| Slow to fast | Starts slowly from rest and speeds up into the next keyframe. Good for leaving a view. |
Whatever the easing, a move never starts or stops abruptly. Where the camera starts moving, it speeds up gently from rest over the first quarter of the move; where it comes to a stop, it slows down gently over the last quarter. That's at a clip's first and last keyframe, and at a keyframe with the same view as the one before or after it (a hold). Where the move carries on through a keyframe to the next, it keeps going without slowing down.
Each keyframe has its own easing, for the move from it to the next keyframe. Move the playhead onto a keyframe, or anywhere between it and the next one, and pick the easing: it applies to that move. The field shows the easing of the move the playhead is in, and is greyed out before a clip's first keyframe and from its last keyframe on, where nothing moves. Choosing an easing doesn't need reframe authoring armed.
New keyframes, and the keyframes Track subject sets, are linear. A keyframe keeps its easing when you change its view.
Track subject
Track subject follows a person, vehicle or other subject through the clip and sets the keyframes for you, so the camera keeps it in view.
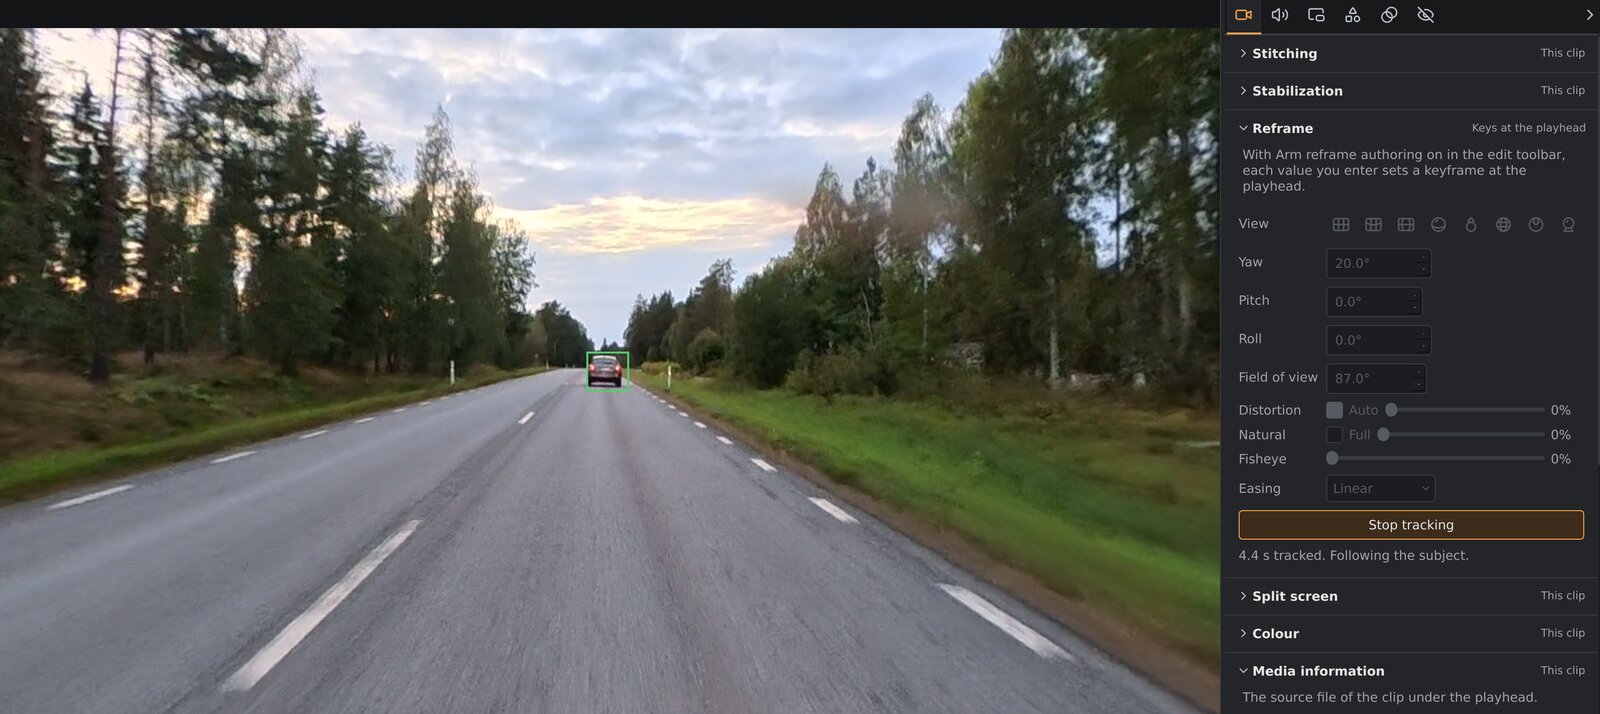
- Move the playhead to where tracking should start. The subject has to be visible there.
- Look around in the viewport until the subject is in view.
- Click Track subject… in the Reframe section, or press
T. Playback pauses. - Drag a box around the subject in the viewport. Fit it closely: a box
with a lot of background around the subject is easier to lose. (
Esccancels.) - Tracking starts. The viewport plays the clip, with the camera following the subject and a box drawn around it: green while the tracker is sure it has the subject, red while it has lost it. The Reframe section shows how far it has come.
- Tracking runs to the end of the clip. To stop earlier, click Stop
tracking, or press
Space,EscorT.
The camera only turns to follow the subject. It keeps the field of view, distortion and roll of the view you drew the box in, so choose the zoom before you start.
When tracking ends, the tracked path is turned into keyframes, from the start of tracking to the last frame where the subject was seen. They replace any keyframes the clip had in that stretch. Keyframes before and after it stay. The playhead is left at the end of the tracked stretch, and the edit toolbar says how many seconds and keyframes were tracked.
If the subject is lost. When the subject is hidden for a while (behind a truck, a tree, or out of sight), the box turns red. Tracking goes on and may find the subject again. If it doesn't, stop it: the keyframes run up to where the subject was last seen, and the playhead waits there. Move the playhead to where the subject is visible again and track again from there.
The tracked keyframes are ordinary keyframes. You can change or delete any of them, add your own, or delete them all and try again.
If Track subject is greyed out. With a note under the button, the tracking model is missing from the installation: install orbis-reframe again. Without a note, the timeline is empty or an export is running.
Tracking works on the stabilized picture, so a shaking camera doesn't throw it off. It works best with a subject that stands out from its background and isn't too small in the view.
Split screen
A clip's picture can be split into two or four panes. Each pane shows the same 360° clip from its own direction, with its own keyframes: the road ahead and the road behind at once, or the four sides of the camera.
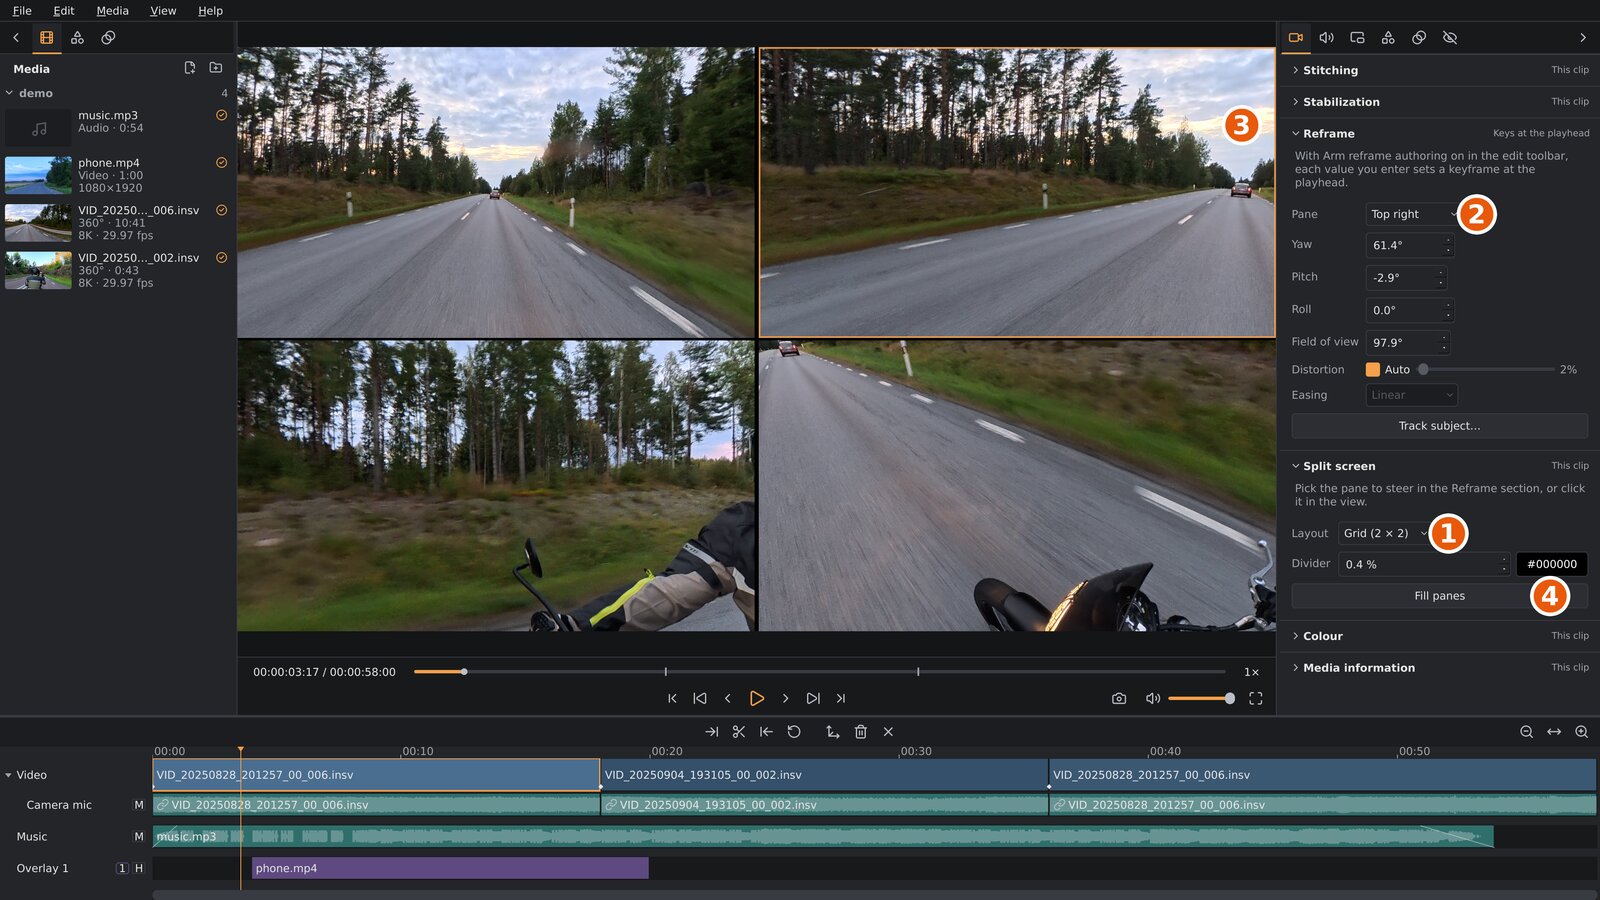
- Layout, in the Split screen section: one picture or how the panes are arranged.
- Pane, in the Reframe section: the pane you're steering, the active pane.
- The active pane, outlined in the viewport.
- Fill panes: points every pane in its own direction in one go.
Splitting a clip
Move the playhead into the clip, or select it.
In the Split screen section (settings sidebar, Video tab, under Reframe), pick a Layout:
Layout Panes One picture No split: the whole picture is one view. Side by side Left and right. Stacked Top and bottom. Grid (2 × 2) Top left, top right, bottom left, bottom right.
The first pane keeps the clip's view and keyframes; if the clip has no keyframes yet, the first pane gets one at the playhead with the view you see. Each new pane gets a keyframe at the playhead that looks away from the first pane's view: back for two panes; right, left and back for the grid, with opposite views diagonal. A new pane's field of view is set so that the pane takes in 90° from side to side.
Each pane has its own shape. The field of view is corner to corner, so a very wide pane takes in a lot from side to side and little up and down. Side by side in a 16:9 video, each pane is almost square; stacked, each is very wide.
Steering a pane
The active pane is the one with the outline in the viewport. Everything
that changes the view acts on it: dragging and the mouse wheel in the
viewport, the View buttons, the Yaw, Pitch, Roll,
Field of view, Distortion, Natural, Fisheye and Easing fields, K, Shift+K and Delete all keyframes, and
Track subject…. The keyframe diamonds on the clip are the active
pane's, and Shift+↓ / Shift+↑ go to its keyframes.
To make another pane active, click it in the viewport, or pick it under Pane at the top of the Reframe section (it's there only while the clip is split). A press on another pane also starts a drag there, so with reframe authoring armed you can click and drag in one go. The outline is only in the viewport, not in the export or a screenshot.
Track subject works in the active pane: draw the box in it, and the tracked path becomes that pane's keyframes.
Fill panes, in the Split screen section, sets a keyframe at the playhead in every pane: the first pane keeps its view, and the others look back (two panes) or right, left and back (the grid) from it, as when you first split the clip.
The divider
Divider sets the line between the panes: its width, as a share of the video's height (0.4 % is about 4 pixels at 1080p; 0 lets the panes touch), and its colour.
Split clips on the timeline
The split belongs to the clip, like its keyframes. At a cut the picture changes to the next clip's layout. A split clip's halves and a duplicate keep the split. A transition into or out of a split clip blends the whole split picture.
Going back to One picture keeps the other panes' keyframes: pick the
layout again and they're back. Edit ▸ Undo (Ctrl+Z) undoes a split
like any other edit.
A pane without keyframes is exported looking straight ahead, like a clip without them. The Reframe section warns while the playhead is in a clip whose active pane has none.
A project with a split clip can't be opened by orbis-reframe versions before split screen.
Flat videos
A flat video on the video track (The timeline) isn't reframed: there's nothing around it to look at. With one selected, or under the playhead, the Reframe section has one setting instead of the view and Track subject…:
| Fit | What you see |
|---|---|
| Whole picture, with bars | The whole video, with black bars where its shape differs from your video's. The default. |
| Fill the frame, edges cropped | The video fills the frame; what sticks out at two sides is cut off. |
A flat video isn't split into panes either: the Split screen section says so instead of showing its settings.